Request Quote

The official 1590 OPL Installation Instructions can be found here. Download PDF for printable version.

All Types - 1590 Series


Attention!
CAUTION -- Transportation
- Lay boxes flt. Do not stand on end as box could fall over and cause injury.
- Outdoor Parcel Lockers (OPL) are heavy. Use caution when lifting and carrying to avoid injury.
CAUTION -- Handling
- Use caution when lifting and carrying Outdoor Parcel Lockers (OPL) to avoid injury.
- Pinch hazard exists when placing unit on foundation.
- Keep figers and hands clear to avoid injury.
CAUTION -- Installation
- Outdoor Parcel Lockers (OPL) are heavy. Do not stand OPL up without support to prevent tipping.
- Units may tip off unsecured anchors, possibly resulting in the OPL colliding with a person and causing serious injury.
- OPL is also front-heavy when master load doors are open. Unit should be anchored or held in place until secured to foundation. Installer should support unit or have assistance holding the unit in place before opening the master load doors. Failure to do so could result in serious injury.
valiant™ outdoor parcel locker - 1590 Series
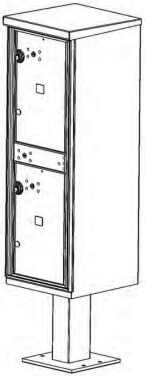
1590T1
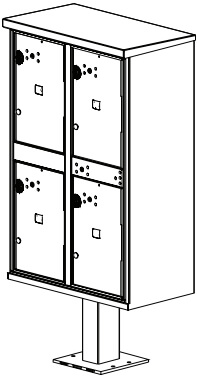
1590T2
| 1590T1 | 1590T12 | |
|---|---|---|
| INSTALLED HEIGHT | 62" | 62" |
| DEPTH | 18" | 18" |
| WIDTH | 16" | 30 - 1/2" |
| PEDESTAL HEIGHT | 14 - 1/2" | 14 - 1/2" |
| WEIGHT (WITHOUT PEDESTAL)* | 83 LBS | 122 LBS |
| WEIGHT (WITH PEDESTAL)* | 100 LBS | 139 LBS |
| QTY OF PARCEL COMPARTMENTS | 2 | 4 |
| PARCEL COMPARTMENT HEIGHT | 19-3/4" | 19-3/4" |
| PARCEL COMPARTMENT WIDTH | 12" | 12" |
* Weights do NOT include packaging - product only.
For installation of Florence vogueTM decorative accessories with the 1590T2, please refer to manual located within the vogueTM product packaging.
valiant™ outdoor parcel locker - 1590 Series
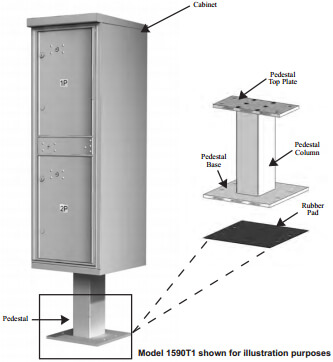
Before beginning the assembly process, please review the illustration. The major components that you will be working with, and that are referred to in this manual, are identifid so as you are installing your valiant™ outdoor parcel locker (OPL), you will be familiar with the terms that are used.
valiant™ outdoor parcel locker - 1590 Series
The OPL cabinet and pedestal are packaged separately. Below is a list of components and hardware you will receive in each package.
- Pedestal Package:
- Template - guide to locate pedestal base anchors
- Rubber Pad - installed between ground and pedestal base
- Pedestal - fully assembled
- Cabinet Package:
- Parcel lockers in protective cabinet
- Hardware kit in plastic bag (shipped inside unit compartment) that includes:
- Pedestal hardware
- Parcel keys and tags
- Installation manual
- Cleaning instructions
- Cleaning instructions
- Parcel door hardware (in plastic bag inside cabinet) - (2) McGard and (3) two-way screws; (4) Arrow Lock nuts; and panel lock covers attached with temporary plastic fasteners.
- Outdoor Installation -- anchoring systems for concrete pads are discussed in the next section, "Concrete Foundation Preparation".
NOTE: Anchors are not included with this product. Anchoring system for concrete pads are discussed in the next section, "Concrete Foundation Preparation" and should be purchased separately.
valiant™ outdoor parcel locker - 1590 Series
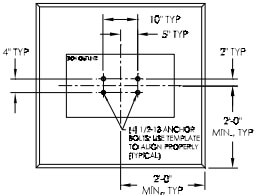
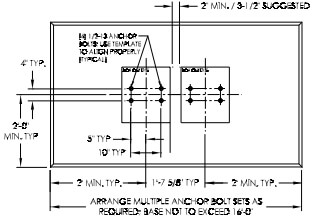
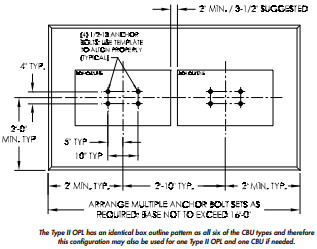
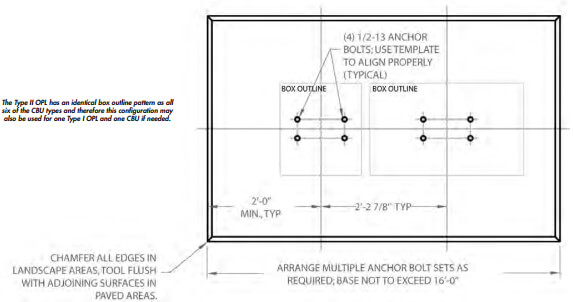
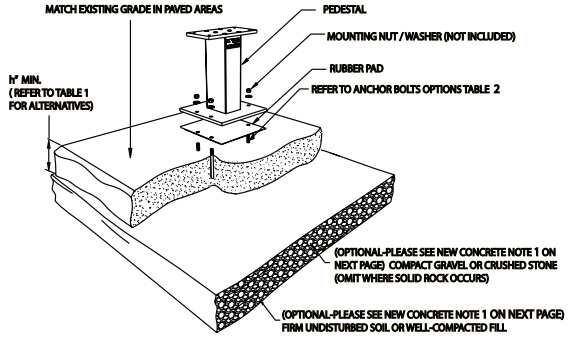
NOTE: For ALL installations, regardless of OPL type, chamfer all edges of pad in landscape areas, tool flsh with adjoining surfaces in paved areas.
valiant™ outdoor parcel locker - 1590 Series
valiant™ outdoor parcel locker - 1590 Series
- Depending on climatic and soil conditions in the area of installation, optional foundation material may be necessary as shown. Consult local building codes for recommendations.
- Refer to Table1 for thickness (h), width (w), and depth (d) of the concrete pad alternatives.
- Concrete shall have a compressive strength of 3000 psi @ 28 days, contain 4% min ~ 6% max air entrapment and be placed with a 3.50~4.50 slump in accordance to 301.
- Use wire mesh as per (Standard) or fier reinforced concrete as per (Standard).
- Existing concrete pad must be at least 48" wide.
- Concrete base and anchor bolts may be reused if:
- existing ½" diameter expansion anchor bolts are fimly embedded in the concrete and not damaged or corroded;
- concrete foundation is not damaged; and
- bolt hole pattern of the new unit matches the installed anchor bolts.
- Additional considerations include:
- if concrete is only 4" thick, then option ' b' in Table 2 below cannot be used
- any unused, existing anchor bolts must be cut flush to the level of the concrete surface
- if concrete is damaged, replacement of foundation pad is required
TABLE 1: Pad Recommendations
| h (Thickness) | w (Width) min | w (Depth) min |
|---|---|---|
| 4" | 47" | 47" |
| 5" | 44" | 44" |
| 6" | 42" | 42" |
| 7" | 40" | 40" |
| 8" | 39" | 39" |
TABLE 2:
| Expansion Anchor Bolt Recommendations |
|---|
| a. Hilti Bolt II
- 1/2 inch diameter x 5 1/2 inches overall length - Galvanized - KB II 12-512, Stainless steel Mininum embedment in concrete must be at least 3 1/2 inches |
| b. ITW Ramset Redhead Turbolt
- 1/2 inch diameter x 7 inches overall length - Galvanized Mininum embedment in concrete must be at least 4 1/8 inches |
| c. Rawl Stud
- 1/2 inch diameter x 5 1/2 inches overall length - Galvanized Mininum embedment in concrete must be at least 4 inches |
valiant™ outdoor parcel locker - 1590 Series
In the event the concrete pad the OPL is being installed on is not level, the pedestal may be adjusted.
There are a number of leveling techniques used by construction professionals; however, the following leveling method is being suggested as one alternative to consider.
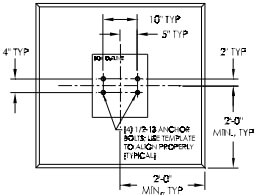
If embedded anchors are not already in place in existing concrete, determine placement and location for anchors. (See "Concrete Foundation Preparation" guide in prevous section for anchor recommendations and placement dimensions.)
- 1Install Anchors (Skip if existing concrete and anchors are already in place)
- Tape pedestal base template to concrete in proper location(s).
- Drill holes through template to proper depth.
- Remove template and debris.
- Pound anchors in place.
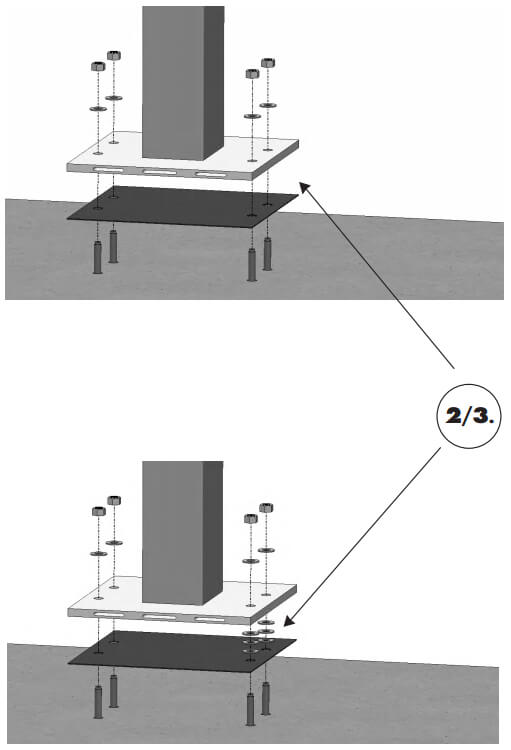
- 2Use Pedestal to Check for Level
- Place rubber pad over anchors onto concrete pad.
- Place pedestal over rubber pad and check if level.
- If leveling is required, shim pedestal with up to 3 washers on a given bolt.
- Washers, if required, should be placed between rubber pad and bottom of pedestal base.
- Check for level.
- 3Install Pedestal to Concrete
- Pedestal can now be installed according to anchoring hardware manufacturer's instructions. (Anchor hardware shown for illustration purposes and is not included with unit. For anchoring system information, please see "Concrete Foundation Preparation" section, page 7.)
- Continue to next section to install OPL cabinet to pedestal.
| PART # | DESCRIPTION |
|---|---|
| 91121 | PEDESTAL |
| 91500 | RUBBER PAD |
| REQUIRED TOOLS |
|---|
| REFER TO ANCHORING MFG INSTRUCTIONS |
valiant™ outdoor parcel lockers - 1590 Series
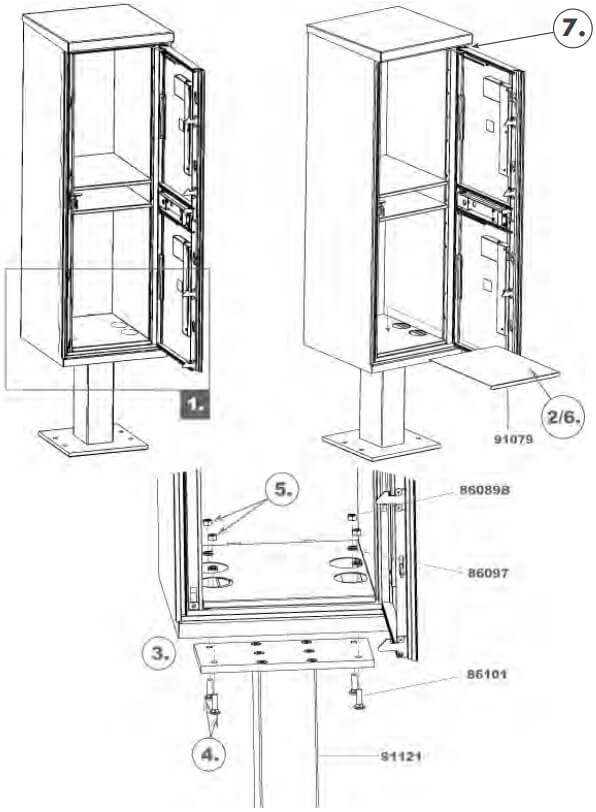
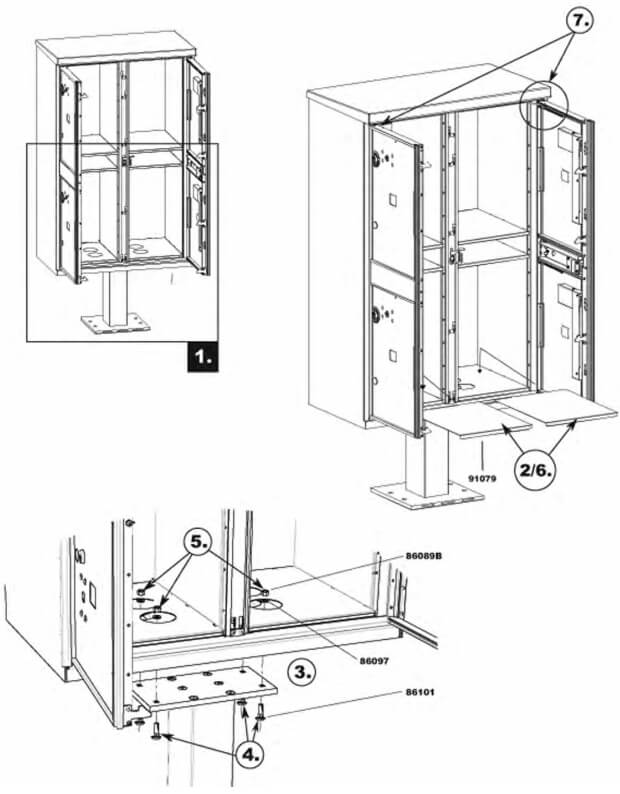
- 1Open master access door and lift handle to open master loading door(s).
- 2Remove 91079 flating shelf(ves), exposing mounting holes.
- 3Place unit on pedestal.
- 4From underneath unit, insert four (4) 86101 carriage bolts upward.
- 5From inside parcel compartment(s), add four (4) 86097 lock washers and tighten four (4) 86089B hex nuts. Torque to 22 foot-pounds.
- 6Replace 91079 flating shelf(ves).
- 7Close master loading doors by fist lifting slightly on the master hold open arm and then shutting each door.
- Close master loading doors by fist lifting slightly on the master hold open arm and then shutting each door.
| PART # | DESCRIPTION |
|---|---|
| 91079 | FLOATING SHELF |
| 91121 | PEDESTAL |
| 86101 | 3/8-16 X 1.25 CARRIAGE BOLT |
| 86097 | 3/8" X .688 OD LOCK WASHER |
| 86089B | 3/8-16 HEX NUT |
| K86101-F | KIT HARDWARE PEDESTAL TO UNIT MOUNTING (INCLUDES CARRIAGE BOLTS, LOCK WASHERS AND HEX NUTS) |
| REQUIRED TOOLS |
|---|
| 9/16" SOCKET WRENCH |
USPS personnel must have a McGard screwdriver to install
and service the parcel Arrow Lock cover on the Florence valiant™ cluster box unit.
(McGard Screwdrivers can be obtained from the USPS Mail Equipment Shop - Part # 110116) McGard Screwdrivers are available only to USPS personnel by faxing an "off catalog" eBuy request to:
USPS MAIL EQUIPMENT SHOP
FAX NO. (202) 281-2643
(McGard Screwdrivers can be obtained from the USPS Mail Equipment Shop - Part # 110116) McGard Screwdrivers are available only to USPS personnel by faxing an "off catalog" eBuy request to:

NOTE:
For USPS applications:
- 1) Arrow Lock is installed by US Postal Service personnel only. Contact your local Post Offie to arrange installation of Arrow Lock and place unit into service.
For Non-USPS applications:
- 1) Please disregard instructions related to Arrow Lock throughout this manual.
- 2) Master access door and parcel door private lock mechanisms will be installed at factory unless otherwise specifid by customer.
- 3) McGard fasteners and screwdriver not necessary for Non-USPS (private delivery) applications.
valiant™ outdoor parcel lockers - 1590 Series
(to be completed by USPS personnel)
- 1OPEN MASTER LOADING DOORS
- 2Remove fie (5) 86091 lock nuts, as well as 92303 lock support plate. Dispose of the plastic shipping spacers.
- 3Place Arrow Lock into the Arrow Lock security bracket and position lock to center the lock core in the door hole.
- 4Replace one (1) 86091 lock nut in the rear position to secure Arrow Lock security bracket.
- 5Install 92303 lock support plate as shown.
- 6Replace four (4) 86091 lock nuts. Torque to 25 to 30 inch-pounds (overtightening may keep Arrow Lock from operating correctly).
| PART # | DESCRIPTION |
|---|---|
| 86091 | 10-32 LOCK NUT |
| 92303 | LOCK SUPPORT PLATE |
| ARROW LOCK (PROVIDED BY USPS) | |
| 64782 | ARROW LOCK SECURITY BRACKET |
| K92300 | KIT ARROW LOCK SECURITY BRACKET (INCLUDES LOCK NUTS, LOCK SUPPORT PLATE & SECURITY BRACKET) |
| REQUIRED TOOLS |
|---|
| 3/8" SOCKET WRENCH |
NOTE:
For USPS applications:
- 1) Arrow Lock is installed by US Postal Service personnel only. Contact your local Post Offie to arrange installation of Arrow Lock.
For Non-USPS applications:
- 1) Please disregard instructions related to Arrow Lock throughout this manual.
- 2) Master access door and parcel door private lock mechanisms will be installed at factory unless otherwise specifid by customer.
valiant™ outdoor parcel lockers - 1590 Series
(to be completed by USPS personnel)
- 1Open parcel door and lock parcel door customer lock.
Note: parcel door customer lock must be in the locked position for key to be removed. - 2Position 93213 parcel door lock stiffener on the parcel door bolts as oriented in illustration.
- 3Install Arrow Lock as shown, position lock to center the lock core in the door hole, securing with four (4) 86455 lock nuts. Torque to 25 to 30 inch-pounds (overtightening may keep Arrow Lock from operating correctly).
- 4Position 64216-SS parcel door Arrow Lock cover, securing with two
(2) 84993 McGard fasteners. Repeat steps 1 - 4 for each additional parcel lock door.
Note: These fasteners require a McGard screw driver (see page 13).
| PART # | DESCRIPTION |
|---|---|
| 93213 | SS PARCEL DOOR LOCK STIFFENER |
| ARROW LOCK (PROVIDED BY USPS) | |
| 86455 | 10-32 THIN LOCK NUT |
| 64216-SS | SS PARCEL DOOR ARROW LOCK COVER |
| 84993 | 10-32 x .312 18-8 SS PASSIVATED MCGARD FASTENER |
| K64216-SS | KIT PARCEL LOCK COVER SS(INCLUDES SS PARCEL DOORARROW LOCK COVER, SS PARCEL DOOR LATCH MECHANISM COVER AND HARDWARE) |
| REQUIRED TOOLS |
|---|
| USPS PROPRIETARY MCGARD TOOL |
| 3/8" SOCKET WRENCH OR NUT DRIVER |
For a complete listing of all available replacement parts and/or maintenance procedures for the valiant™ 1590 series OPL by Florence, please refer to the valiant™ Maintenance Manual which may be downloaded from www.flrencemailboxes.com/downloads.
Service parts are available for purchase through an Authorized Florence Dealer and online at www.flrencemailboxes.com/store.
Thank you for purchasing Florence products!