Maintenance Manual
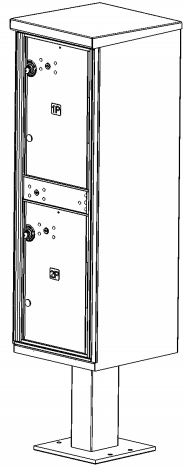
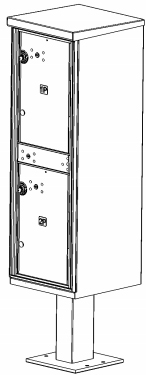
Metal Outdoor Parcel Locker
Type I
1590 Series
OPL Information
Metal OPL Type I
1590 Series
1590T1AF
|
1590T1AF |
| Installed Height |
62" |
|
|
| Depth |
17-7/8" |
|
|
| Width |
15-7/8" |
|
|
| Weight (without Pedestal) |
83 LBS |
|
|
| Replacement of Parcel Door |
16 |
|
|
| Weight (with Pedestal) |
100 LBS |
|
|
| Quantity of Standard Compartments |
0 |
|
|
| Quantity of Parcel Compartments |
2 |
|
|
| Parcel Compartment Height |
19.8" |
|
|
| Parcel Compartment Width |
12.3" |
Security Tool Requirements
Metal OPL Type I
1590 Series
IMPORTANT NOTICE FOR U.S.P.S. INSTALLERS
Installer must order McGard screw driver
(U.S.P.S. - MAIL EQUIPMENT SHOP PART NUMBER 110050)
to install and service the parcel door arrow lock cover
on the Florence OPL.
If the
McGARD SCREW DRIVER MES NO. 110050
needs to be ordered
It may be ordered by faxing an "off catalog" eBuy request to:
U.S.P.S. MAIL EQUIPMENT SHOP
FAX NO. (202) 281-2643
Questions? Call the U.S.P.S. Mail Equipment Shop at (202) 281-2620.
Replacement of Master Loading Door Hold Open Device
Metal OPL Type I
1590 Series
- Note: This will require opening the master
loading door. The local U.S.P.S. will need
to be contacted to have unit opened.
-
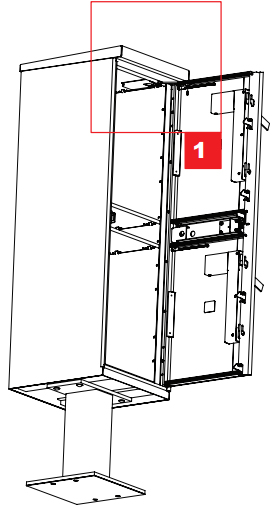
1Open master loading door.
-
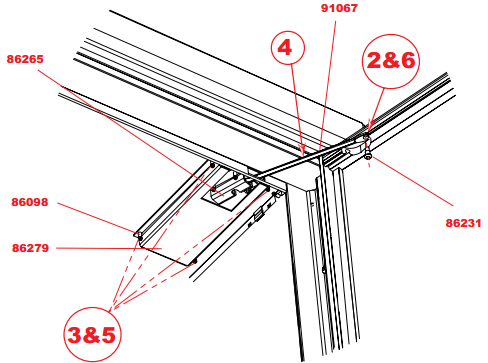
2To disengage hold open device:
Remove one (1) 86231 #6-32 x .187" Torx
head shoulder screw.
-
3To replace hold open device:
Using an 1/8" drill bit, drill out seven (7)
86098 1/8" dia x .328 SS pop rivets that
secure the guard and bracket and remove
the 86279 hold open guard and the 86265
latch hold open bracket.
-
4Remove/replace 91067 hold open arm.
-
5Replace hold open guard and hold open
bracket - replace seven (7) 86098 1/8" dia x
.328 SS pop rivets.
-
6Place Reattach hold open arm with 86231
#6-32 x .187" Torx head shoulder screw.
-
7Close master loading door.
| REQUIRED TOOLS |
| Cordless drill |
| Portable pop rivet gun |
| 1/8" Drill bit |
| Torx+ 15 screwdriver / bit |
| PART # |
DESCRIPTION |
| 86098 |
1/8" Dia x .328" SS pop rivet |
| 86231 |
#6-32 X .187" Torx head shoulder screw |
| 86265 |
Latch hold open bracket |
| 86279 |
Hold open guard |
| 91067 |
Hold open arm |
Replacement of Master Loading Door Hold Open Device
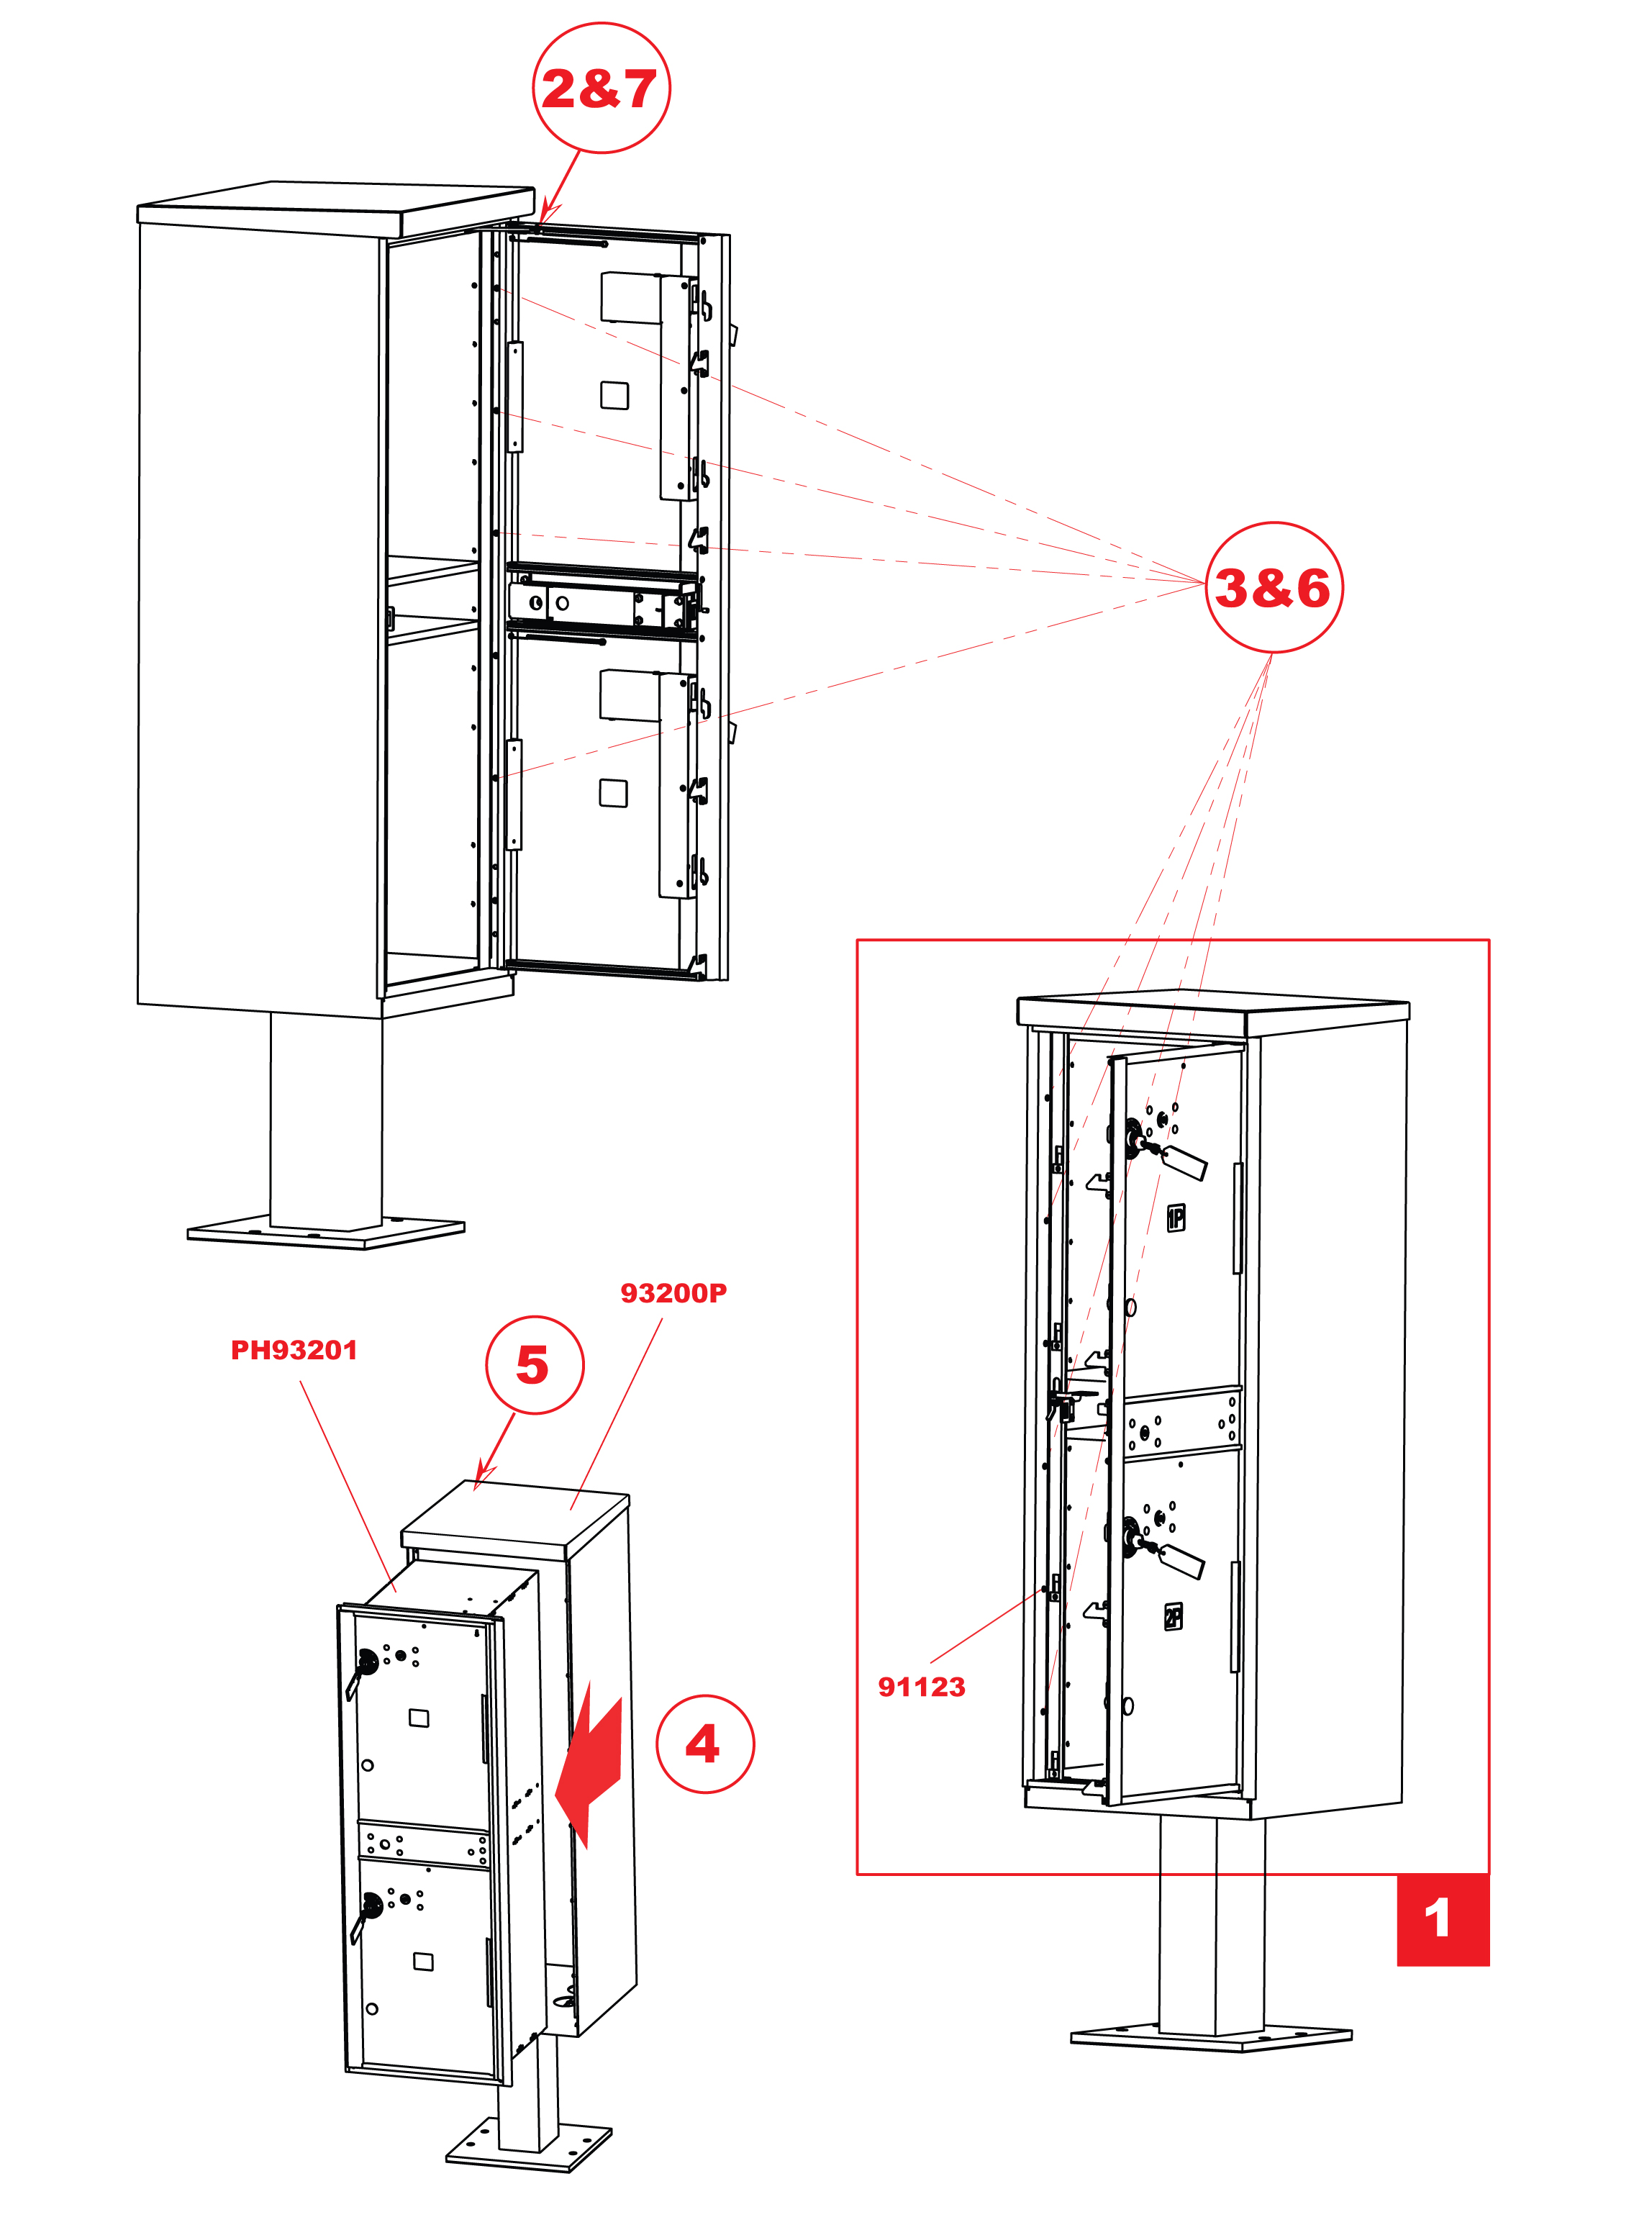
Removal of Insert Assembly
Metal OPL Type I
1590 Series
- Note: This will require opening the master
loading door. The local U.S.P.S. will need
to be contacted to have unit opened.
-
1Open master loading door.
-
2Disengage hold open device (see
instructions page 6).
-
3Remove twelve (12) 91123 #8-32 x .5" Torx
button head screws from insert assembly.
-
4Slide insert assembly out to make repairs to
master loading door and lay flat on back on
non-abrasive surface.
-
5Replace with new or repaired insert
assembly.
-
6Replace twelve (12) 91123 #8-32 x .5" Torx
button head screws from insert assembly.
-
7Put master loading door at a 90° angle and
replace hold open device and close master
loading door (see instructions page 6).
| REQUIRED TOOLS |
| Portable drill |
| Torx+ 15 screwdriver / bit |
| PART # |
DESCRIPTION |
| 93200P |
Cabinet assembly OPL |
| PH93201 |
Insert assembly OPL |
| 91123 |
#8-32 X .5" Torx button head screw |
Removal of Insert Assembly
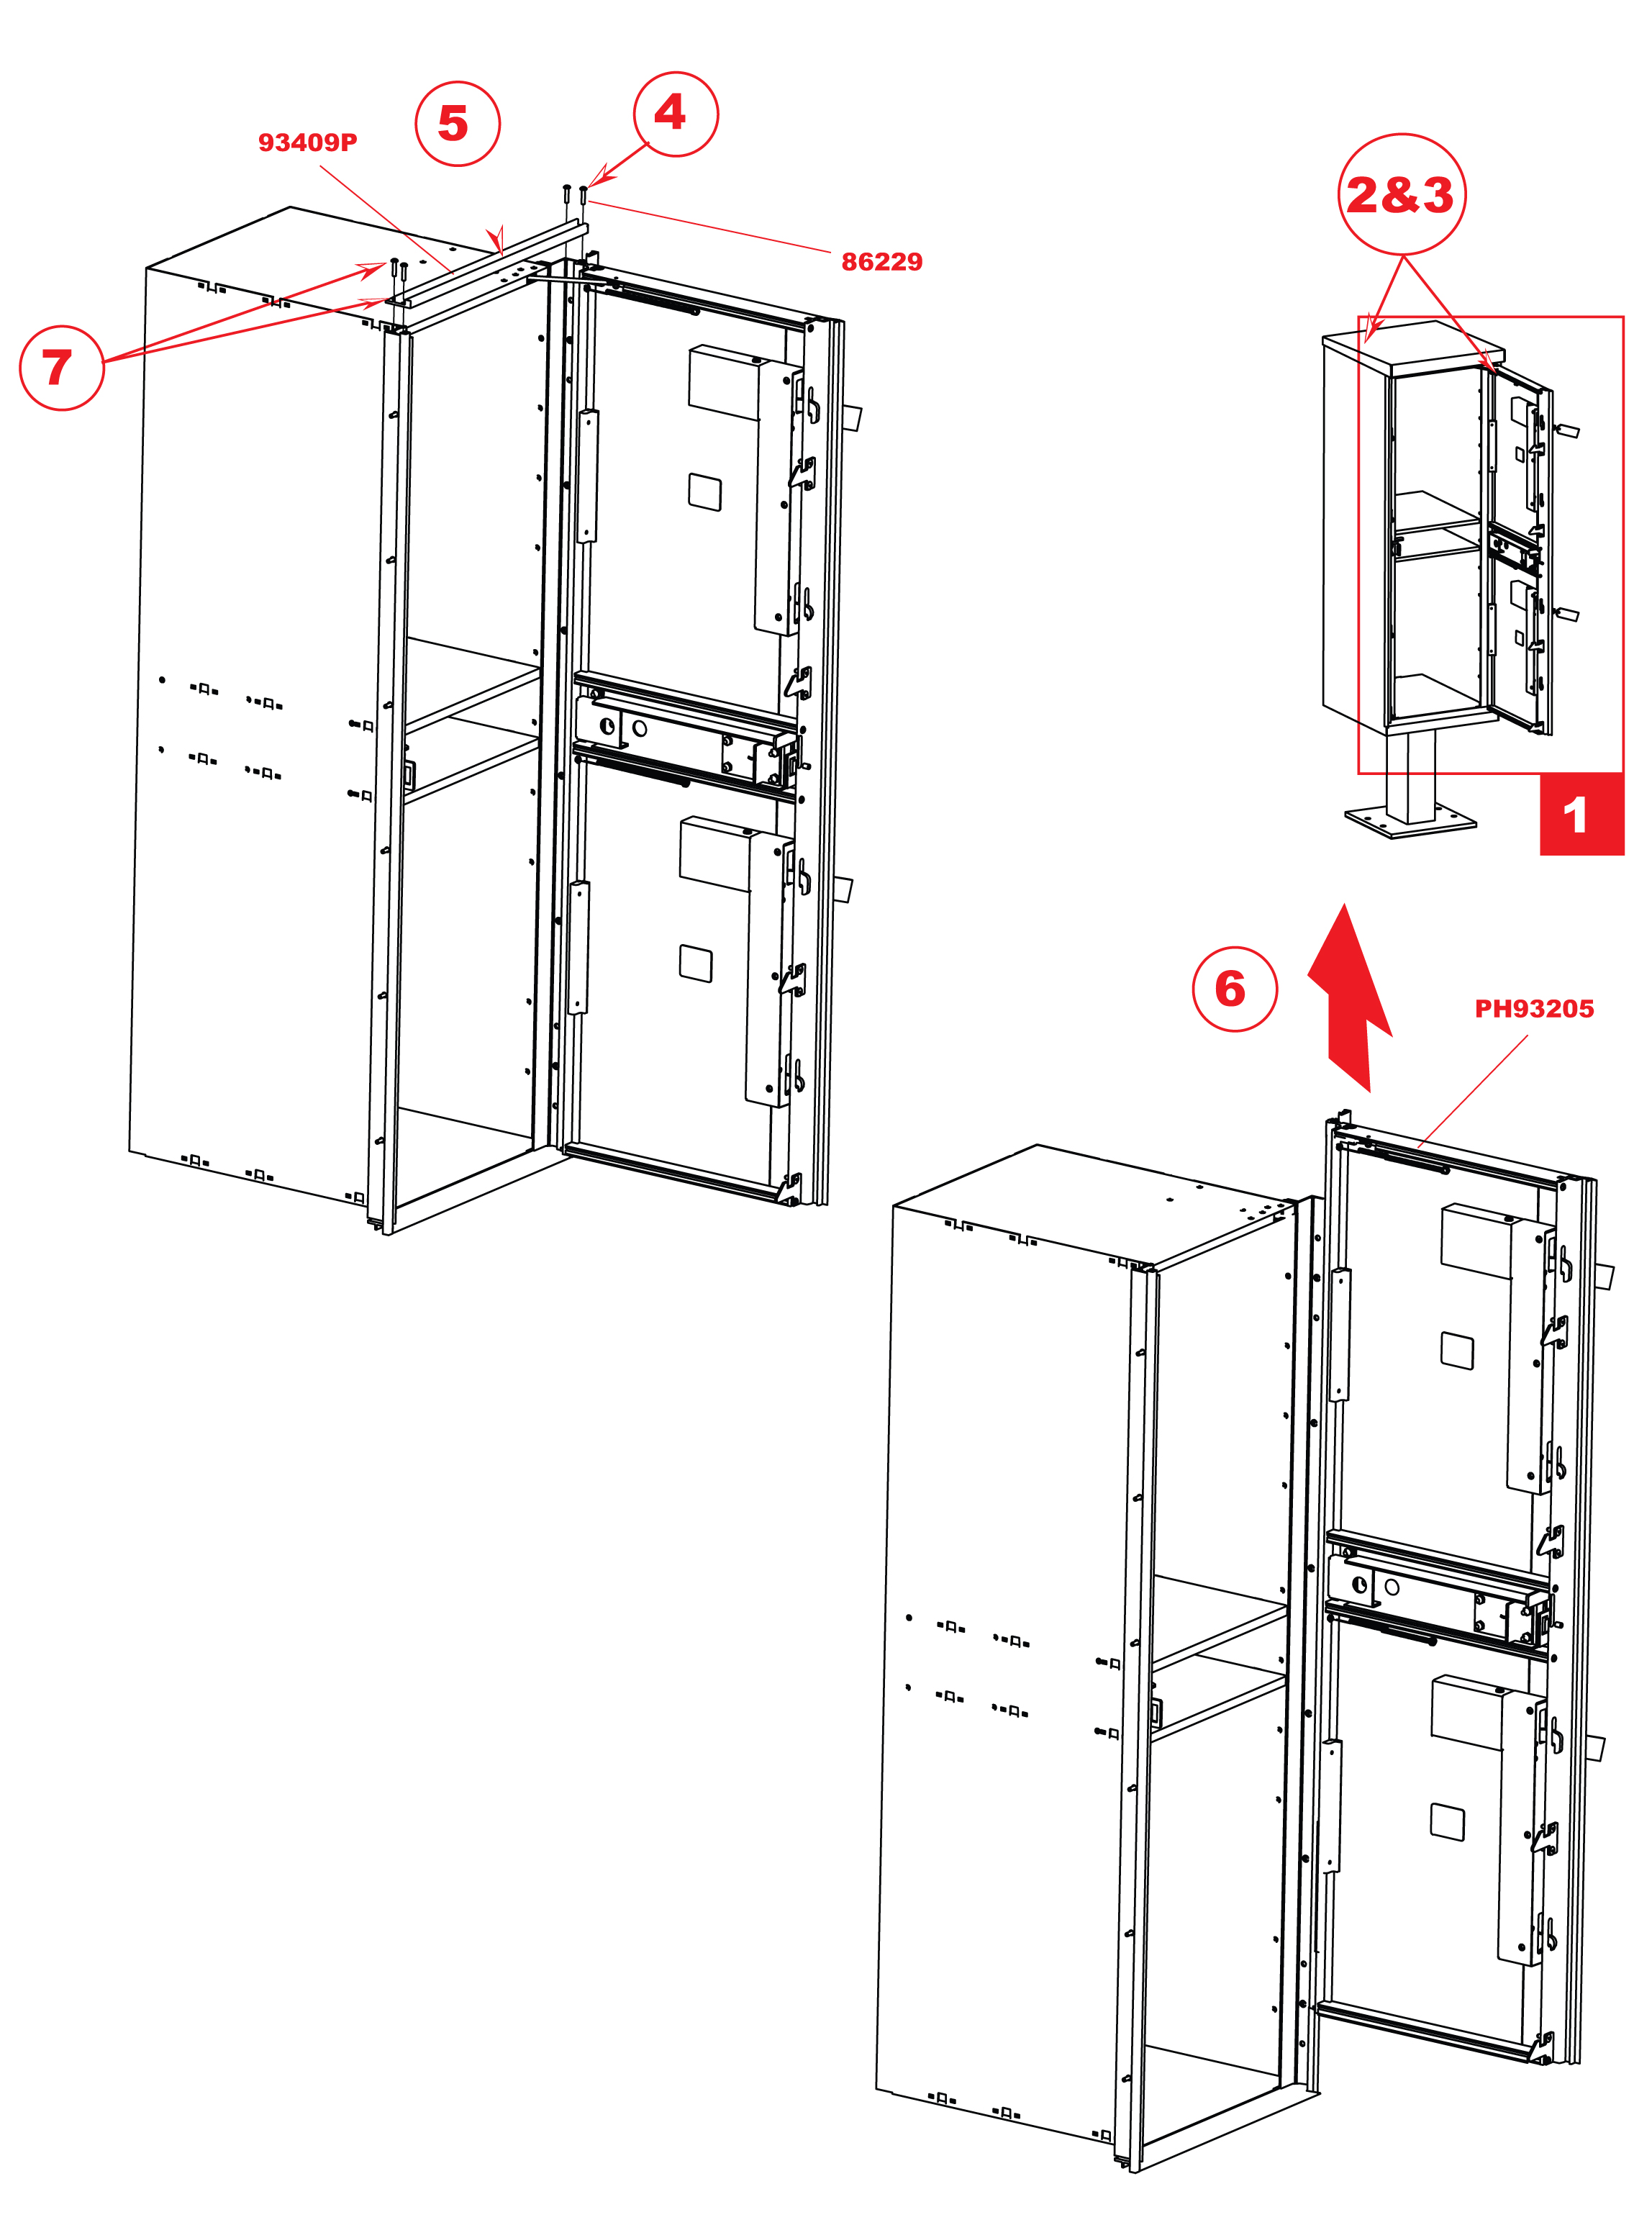
Replacement of Master Loading Door
Metal OPL Type I
1590 Series
- Note: This will require opening the master
loading door. The local U.S.P.S. will need
to be contacted to have unit opened.
-
1Open master loading door.
-
2Disengage hold open mechanism from top
of master loading door (see instructions
page 6).
-
3Remove insert assembly (see instructions
page 8).
-
4Remove four (4) 86229 #8-32 x .75" pan
head machine screws from top of unit.
-
5Remove one (1) 93409P top brace from the
top of unit, exposing master loading door
hinge.
-
6Slide master loading door up through top
of insert assembly and replace with new
master loading door.
-
7Close master loading door and replace one
(1) 93409P top brace from the top of unit,
concealing master loading door hinges.
Replace four (4) 86229 #8-32 x .7" pan
head machine screws.
-
8Replace insert assembly (see instructions
page 8).
-
9Put master loading door at a 90° angle and
replace hold open device and close master
loading door (see instructions page 6).
| REQUIRED TOOLS |
| Torx+ 15 screwdriver / bit |
| Portable drill |
| Pliers |
| PART # |
DESCRIPTION |
| 86229 |
#8-32 x .75" Pan head screw |
| 93409P |
Top brace |
| PH93202 |
Insert assembly w/o hardware |
Replacement of Master Loading Door
Replacement of Hinge Rod
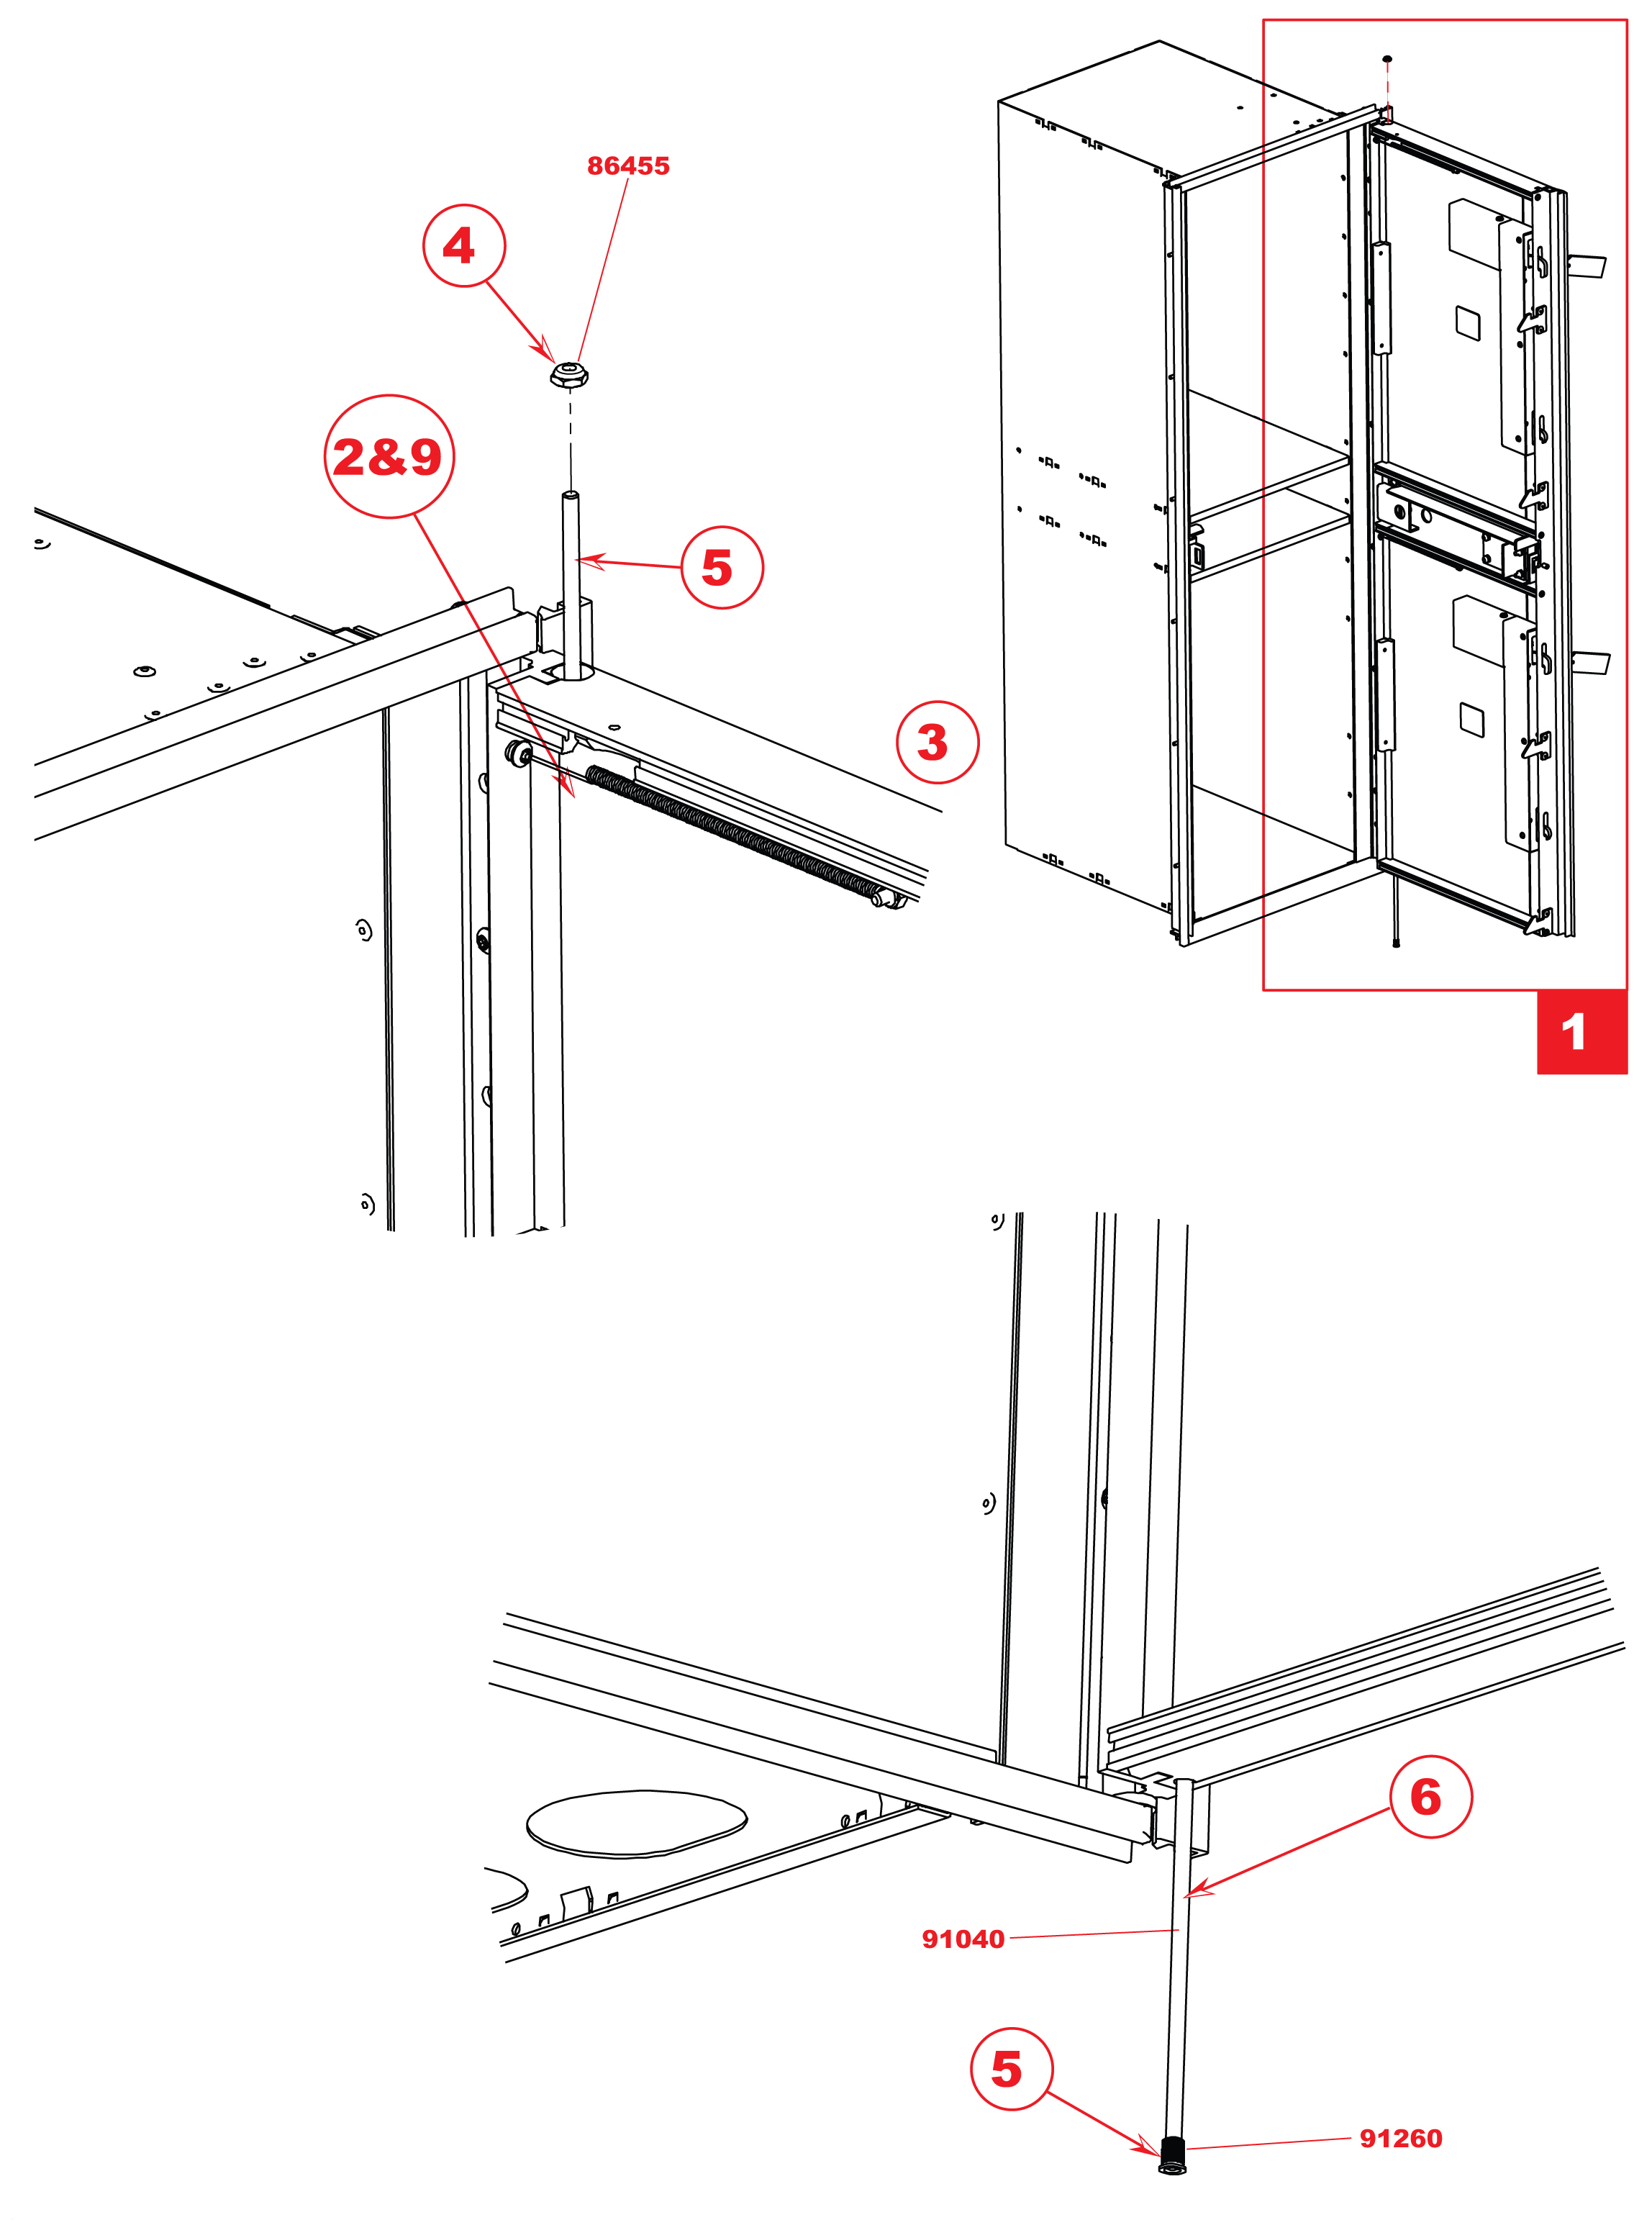
Metal OPL Type I
1590 Series
- Note: This will require opening the master
loading door. The local U.S.P.S. will need
to be contacted to have unit opened.
-
1Open master loading door.
-
2DDisengage hold open device from top of
master loading door (see instructions page
6).
-
3Completely remove insert assembly (see
instructions page 8).
-
4Remove one (1) 86455 #10-32 hex lock nut.
-
5With a hammer and 1/8" rod, from the
top, tap the hinge rod down to dislodge
the 91260 threaded insert at the bottom of
the unit. Remove threaded insert from the
bottom of hinge rod.
-
6Tap the hinge rod up and pull out with
pliers from the top.
-
 Warning: Once the hinge rod
is removed, the Arrow Lock
and parcel doors can fall out,
potentially causing injury.
Warning: Once the hinge rod
is removed, the Arrow Lock
and parcel doors can fall out,
potentially causing injury.
-
7Replace hinge rod by reversing steps 4-6.
-
8Replace insert assembly (see instructions
page 8).
-
9Put master loading door at a 90° angle and
replace hold open device and close master
loading door (see instructions page 6).
| REQUIRED TOOLS |
| 1/8" Rod |
| Plastic Mallet |
| Pliers |
| 3/8" Socket wrench |
| Torx+ 15 screwdriver / bit |
| PART # |
DESCRIPTION |
| 86455 |
#10-32 Hex lock nut |
| 91040 |
Hinge rod OPL |
| 91260 |
Threaded insert |
Replacement of Hinge Rod
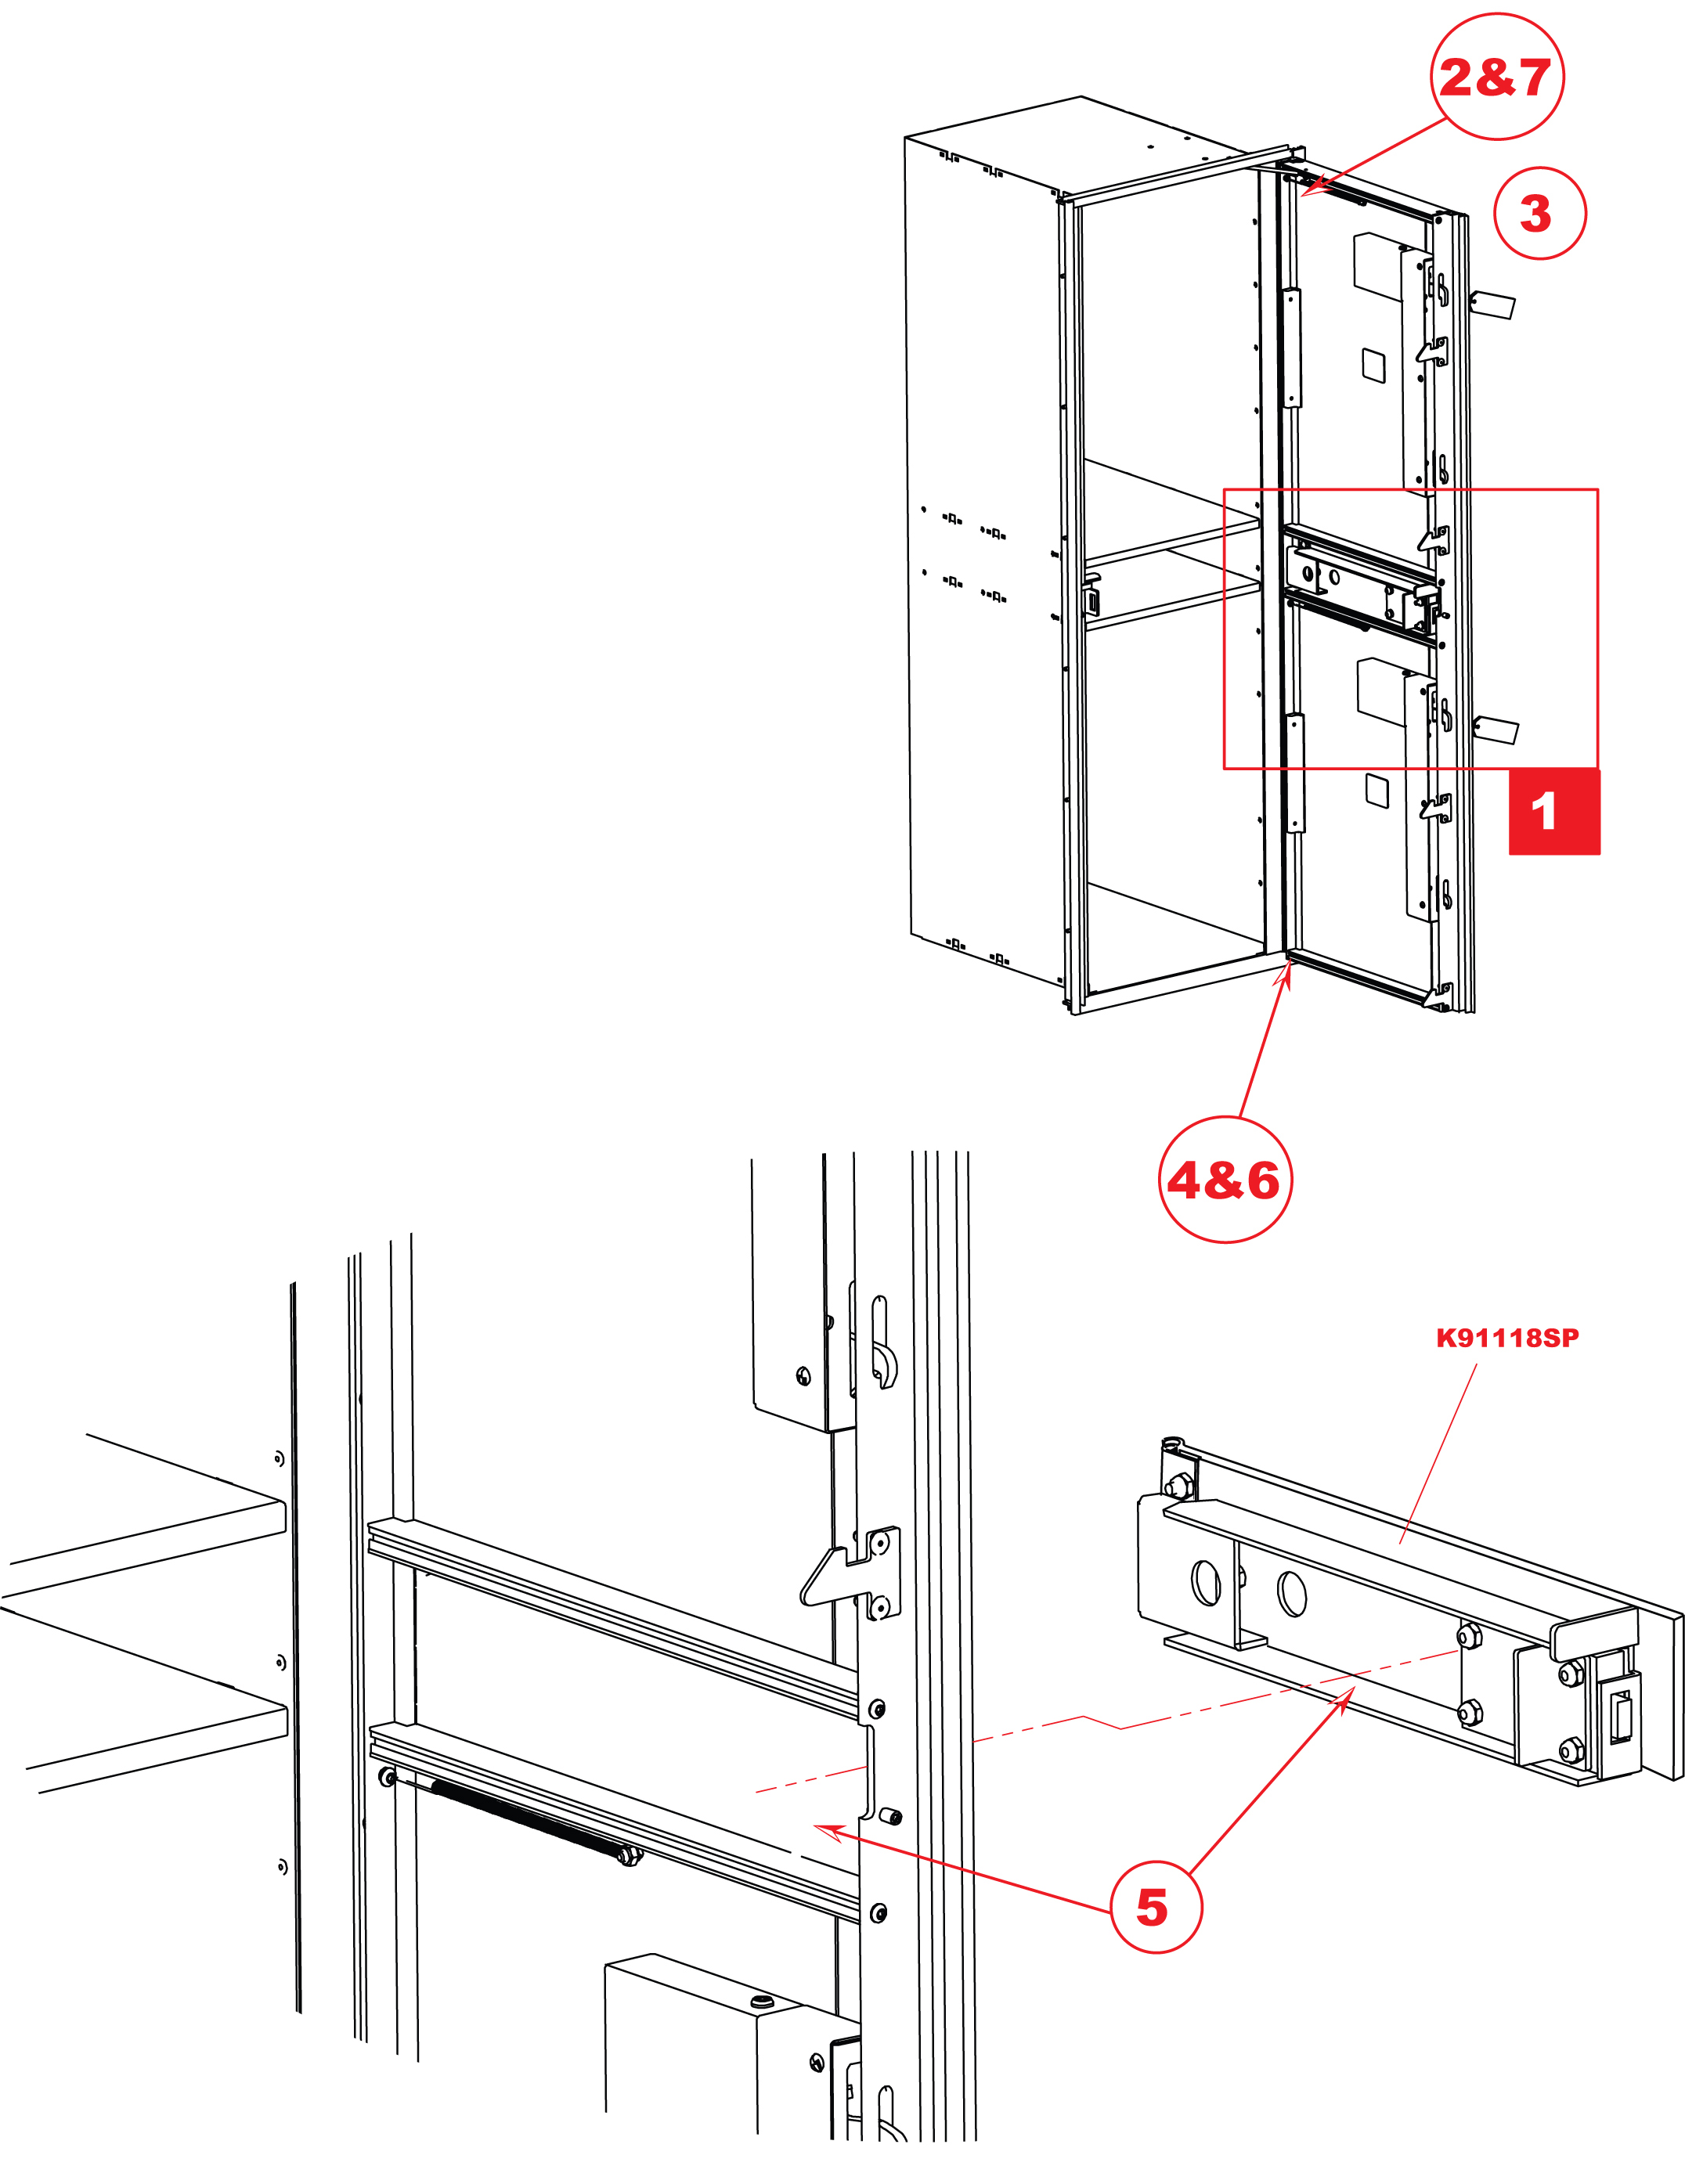
Replacement of Arrow Lock Door
Metal OPL Type I
1590 Series
- Note: This will require opening the master
loading door. The local U.S.P.S. will need
to be contacted to have unit opened.
-
1Open master loading door.
-
2Disengage hold open device from top of
master loading door (see instructions page
6).
-
3Completely remove insert assembly (see
instructions page 8).
-
Warning: Once the hinge rod is
removed, the Arrow Lock and
parcel doors fall out, potentially
causing injury.
-
4Remove hinge rod only as far as necessary
to remove the Arrow Lock door (see
instructions page 12).
-
5Replace K91118SP 3" Arrow Lock door.
-
6Replace hinge rod (see instructions page
12).
-
7Put master loading door at a 90° angle and
replace hold open device and close master
loading door (see instructions page 6).
-
8Install Arrow Lock (see instructions page
18).
| REQUIRED TOOLS |
| 1/8" Rod |
| Portable drill |
| Hammer |
| Torx+ 15 screwdriver / bit |
| PART # |
DESCRIPTION |
| K91118SP |
3" Arrow Lock door |
Replacement of Arrow Lock Door
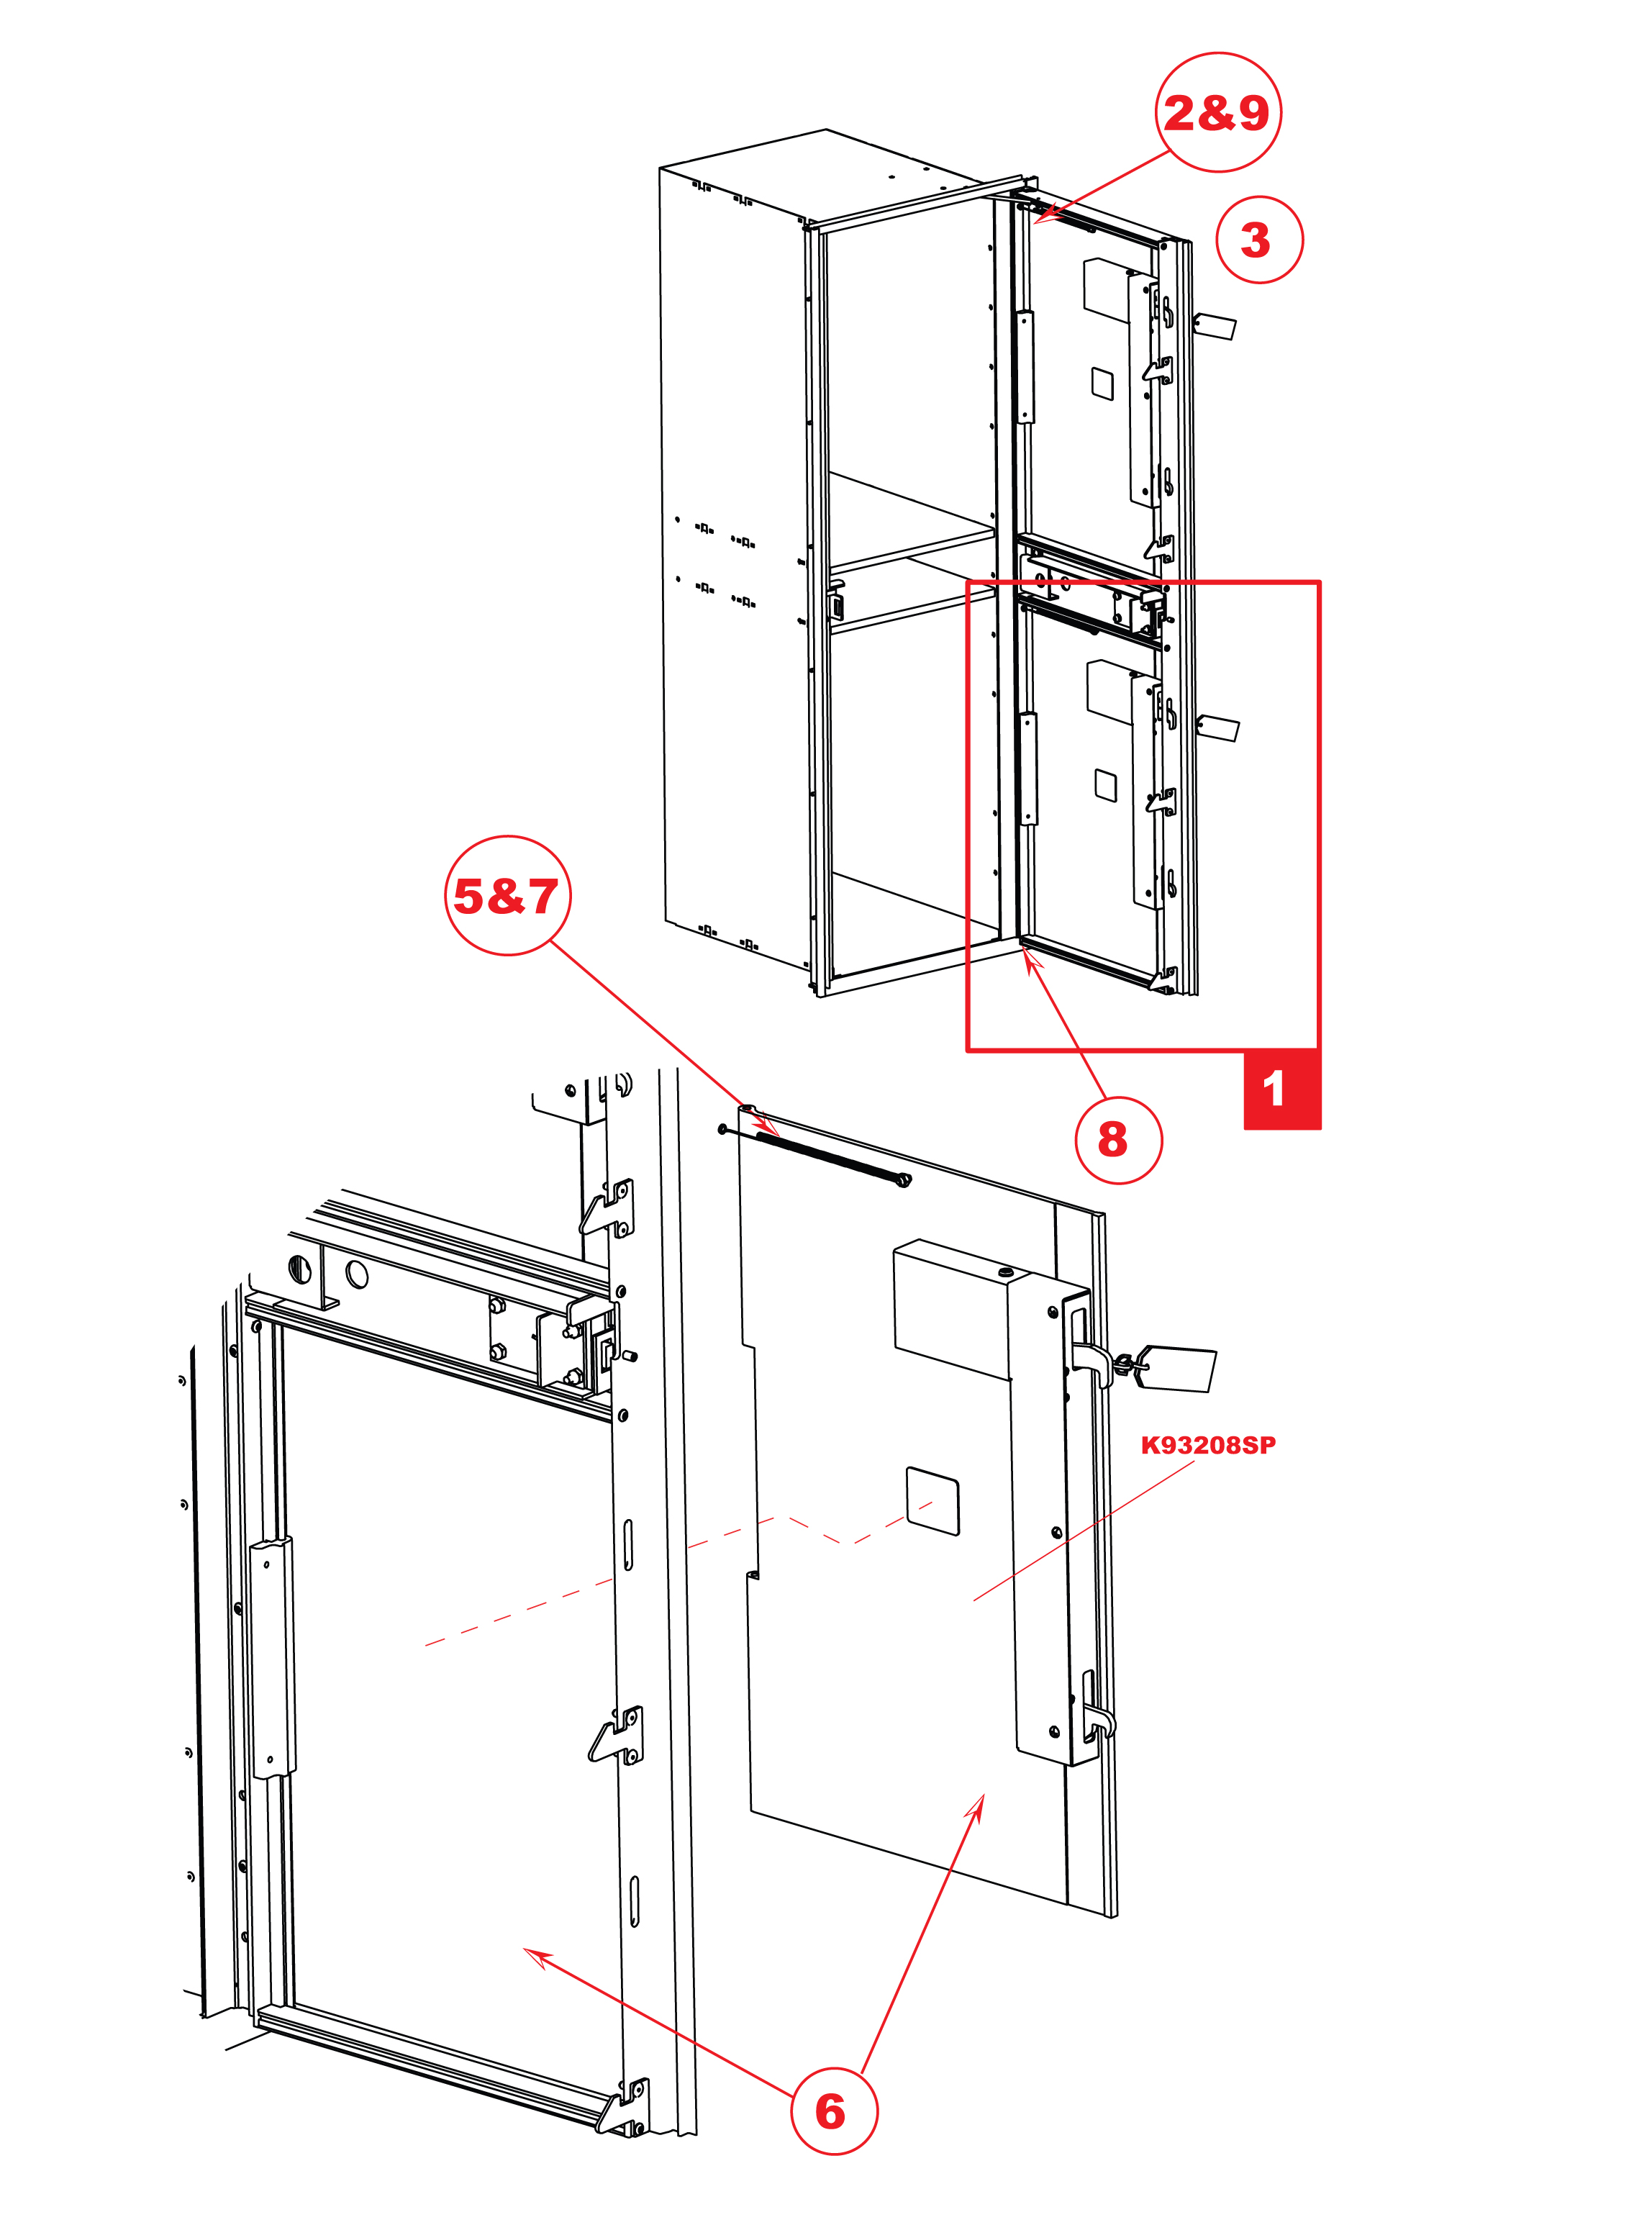
Replacement of Parcel Door
Metal OPL Type I
1590 Series
- Note: This will require opening the master
loading door. The local U.S.P.S. will need
to be contacted to have unit opened.
-
1Open master loading door.
-
2Disengage hold open device from top of
master loading door (see instructions page
6).
-
3Completely remove insert assembly (see
instructions page 8).
- Warning: Once the hinge rod is
removed, the Arrow Lock and
parcel doors fall out, potentially
causing injury
-
4Remove hinge rod only as far as necessary
to remove the effected parcel door (see
instructions page 12).
-
5Remove parcel door spring (see
instructions page 24).
-
6Replace parcel door K93208SP.
-
7Replace parcel door spring (see
instructions page 24).
-
8Replace hinge rod (see instructions page
12).
-
9Put master loading door at a 90° angle
and replace hold open device (see
instructions page 6).
-
10Install lock mechanism (if necessary - see
page 22).
| REQUIRED TOOLS |
| 1/8" Rod |
| Portable drill |
| Hammer |
| Pliers |
| Torx+ 15 screwdriver / bit |
| PART # |
DESCRIPTION |
| K93208SP |
Parcel door assembly w/lock |
Replacement of Parcel Door
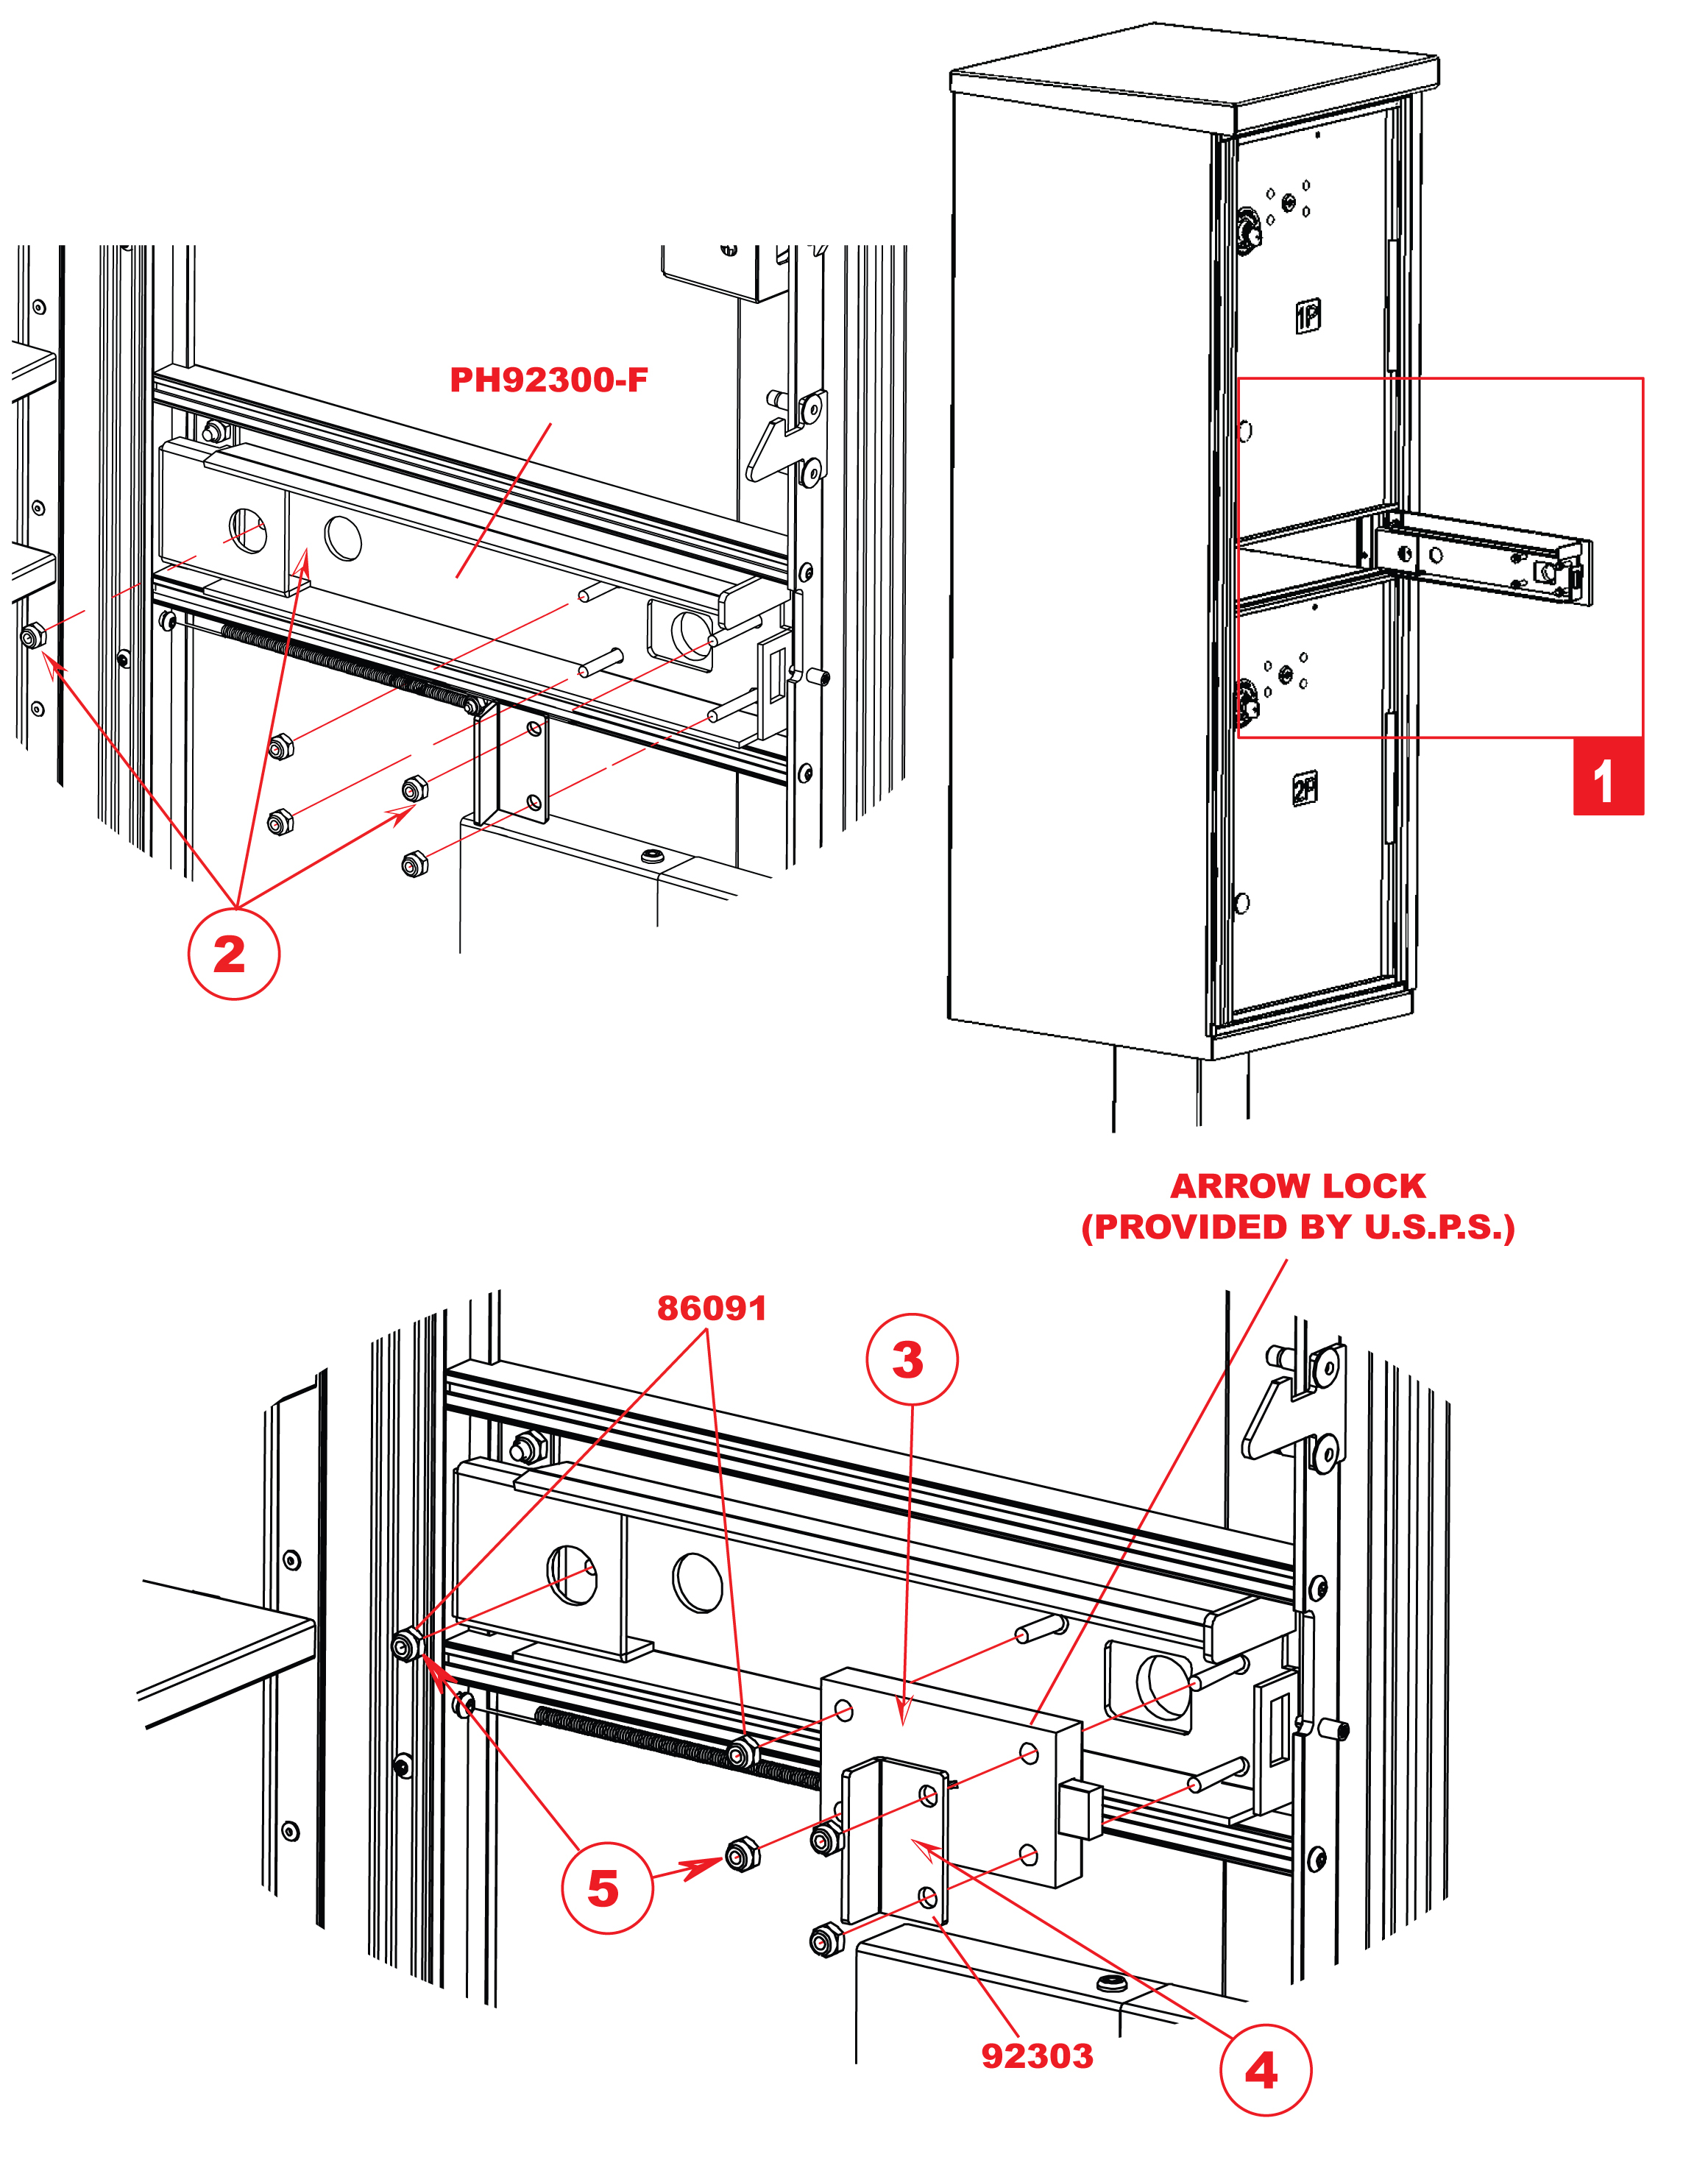
Replacement of Arrow Lock
Metal OPL Type I
1590 Series
- Note: This will require opening the master
loading door. The local U.S.P.S. will need
to be contacted to have unit opened.
-
1Open master loading door.
-
2Remove five (5) 86091 #10-32 lock nuts, as
well as 92303 lock support plate.
-
3Place arrow lock into position
-
4Install 92303 lock support plate as shown.
-
5Replace five (5) 86091 #10-32 lock nuts.
| REQUIRED TOOLS |
| 3/8" Socket wrench |
| Pliers |
| PART # |
DESCRIPTION |
| 86091 |
#10-32 Lock nut |
| 92303 |
Lock support plate |
| PH92300-F |
Arrow Lock security bracket |
|
Arrow lock |
| K92300 |
Kit Arrow Lock Security Bracket
(Includes lock nuts, lock support
plate & security bracket) |
Replacement of Arrow Lock
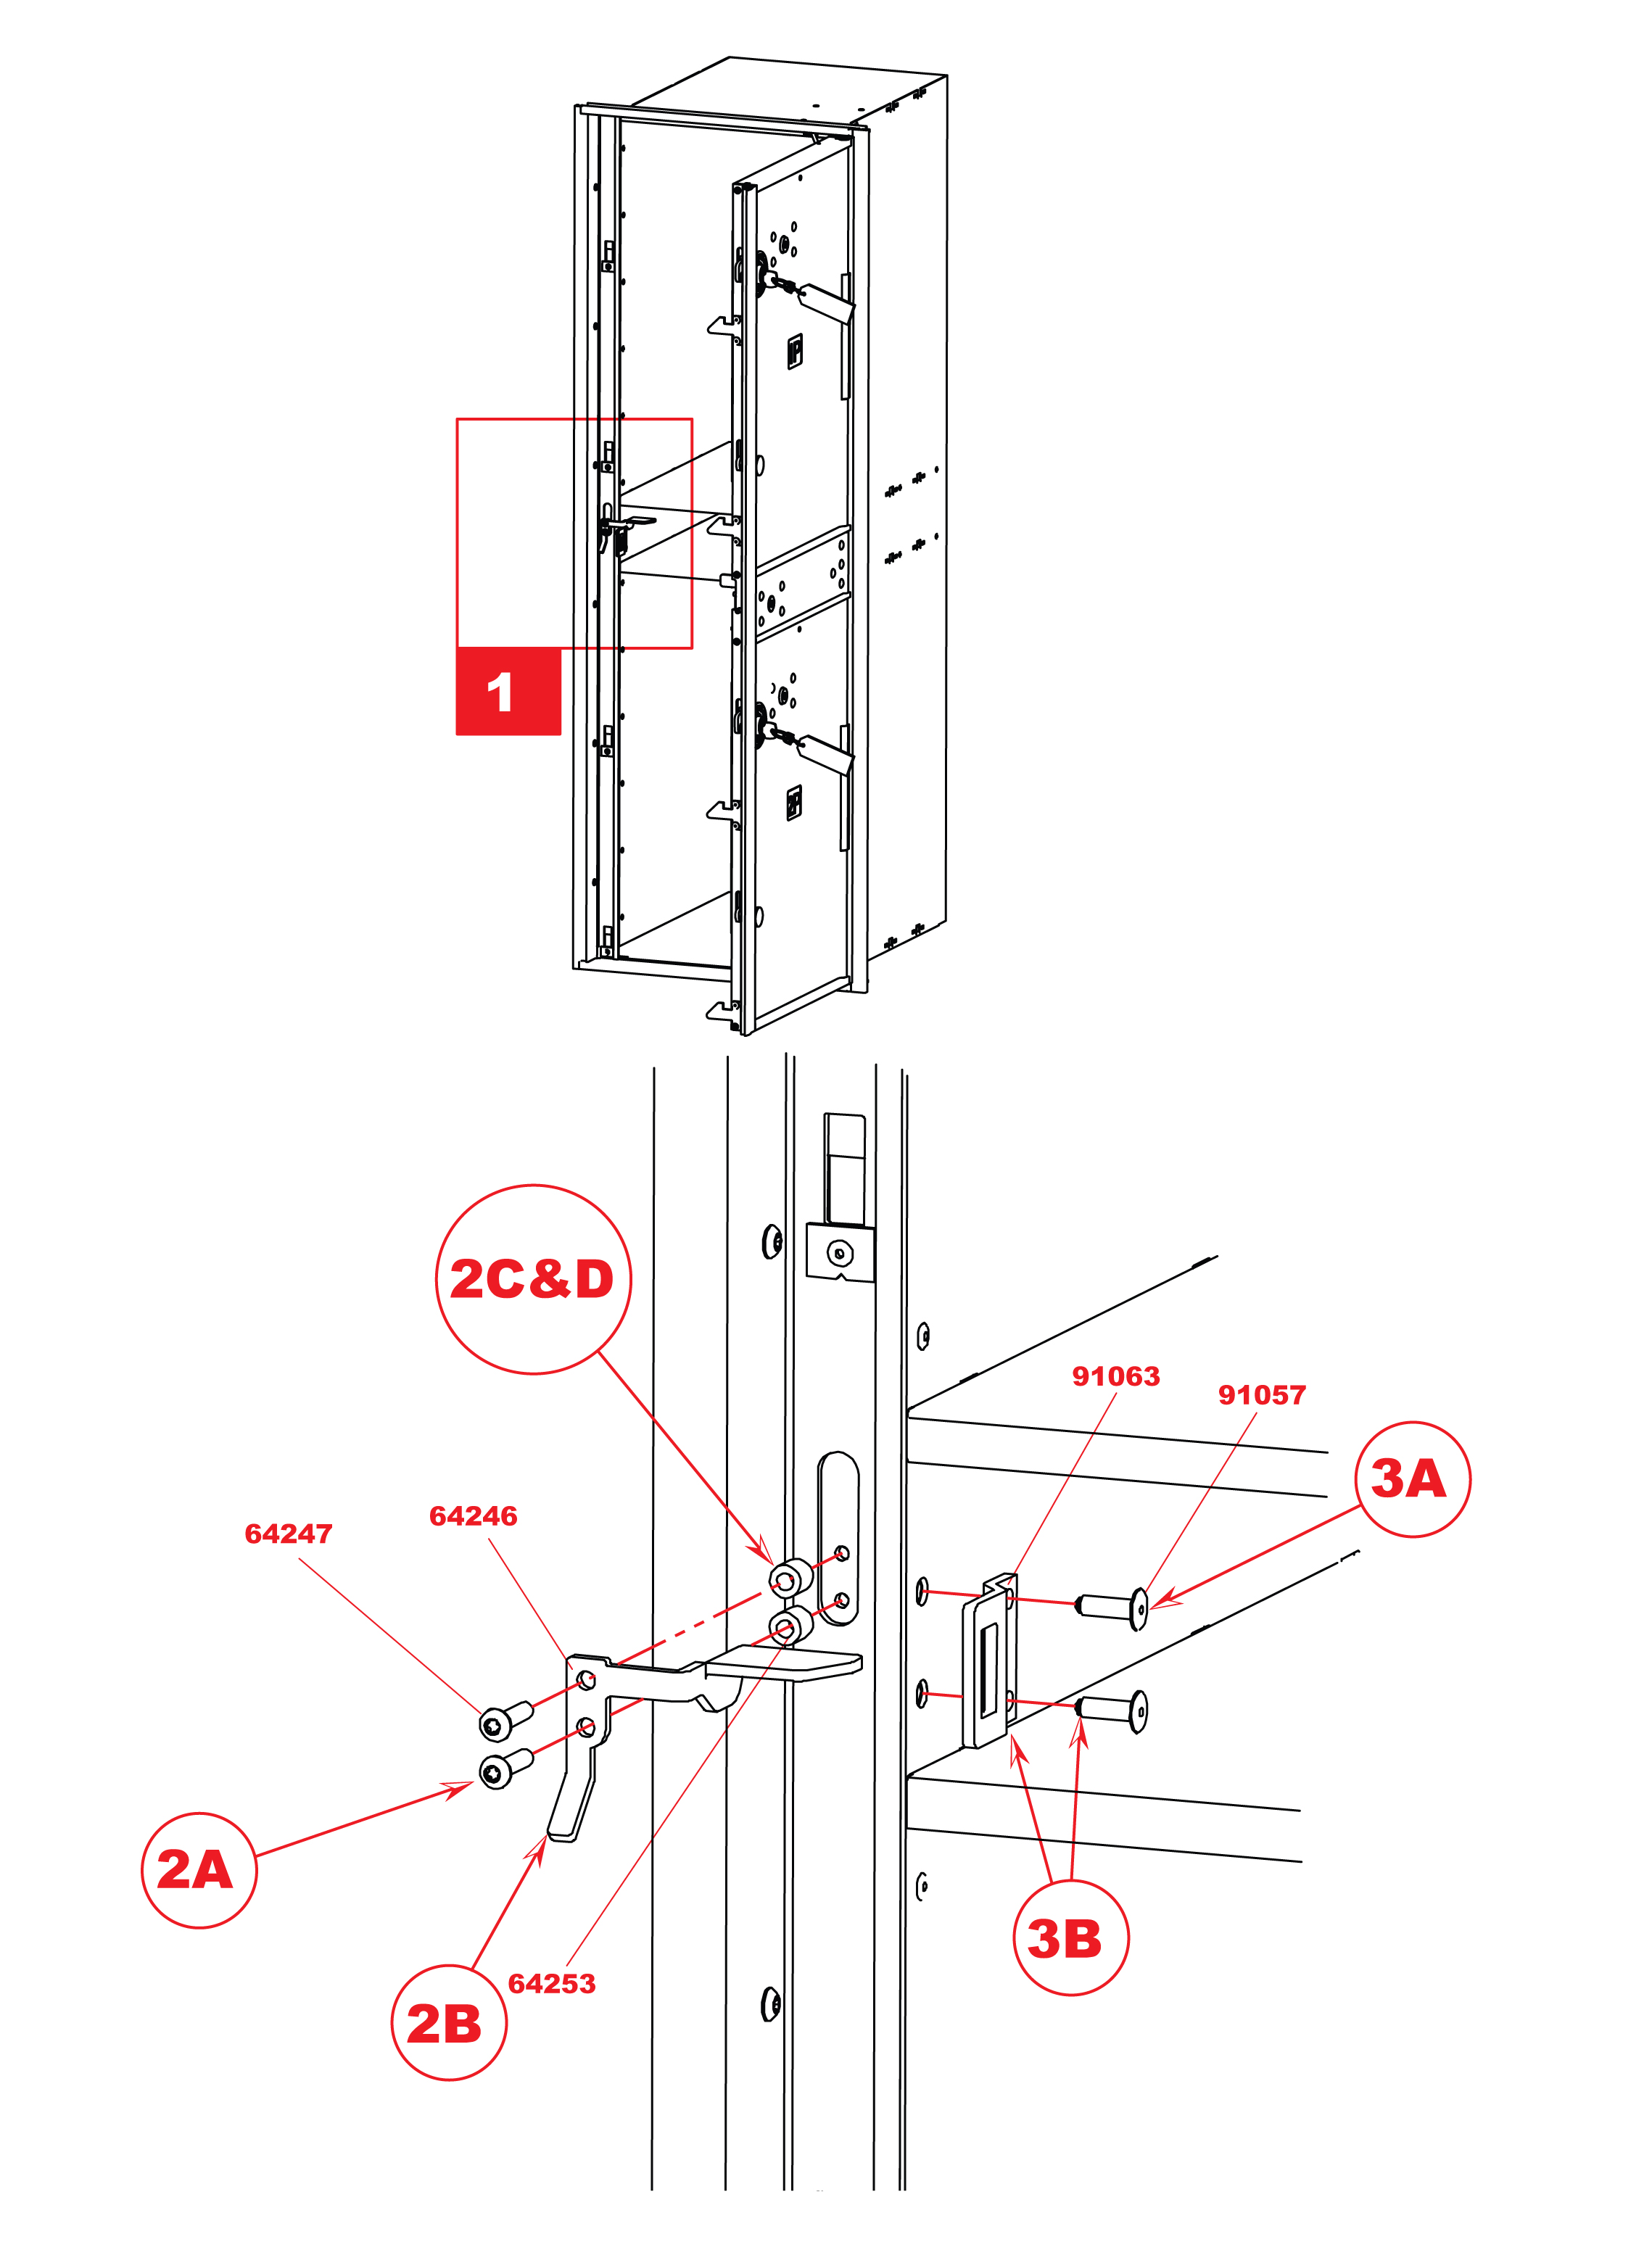
Replacement of Arrow Lock Latch / Release Handle
Metal OPL Type I
1590 Series
- Note: This will require opening the master
loading door. The local U.S.P.S. will need
to be contacted to have unit opened.
-
1Open master loading door.
-
2To replace Release Handle:
-
A. Remove two (2) 64247 #8-32 x .75"
button head screws with Torx wrench.
-
B. Remove 64246 master loading door
release handle - replace with new master
loading door release handle.
- C. Replace two (2) 64253 spacers
- D. Align with mounting holes and replace
two (2) #8-32 x .75" button head screws.
- E. Check for fit/function.
-
3To replace Arrow Lock Latch:
-
A. Drill out two (2) 91057 3/16" dia x .55"
SS pop rivets with 3/16" Drill bit.
- B. Replace 91063 lock bracket - replace two
(2) 91057 3/16" dia x .55" SS pop rivets.
- C. Check for fit/function.
| REQUIRED TOOLS |
| Torx+ 15 bit / wrench |
| Portable drill |
| 3/16" Drill bit |
| Portable pop rivet gun |
| PART # |
DESCRIPTION |
| 64247 |
#8-32 X .75" button head screw |
| 64246 |
Master loading door release handle |
| 64253 |
Spacer |
| 91057 |
3/16" Dia x .55" SS pop rivet |
| 91063 |
Lock bracket |
Replacement of Arrow Lock Latch / Release Handle
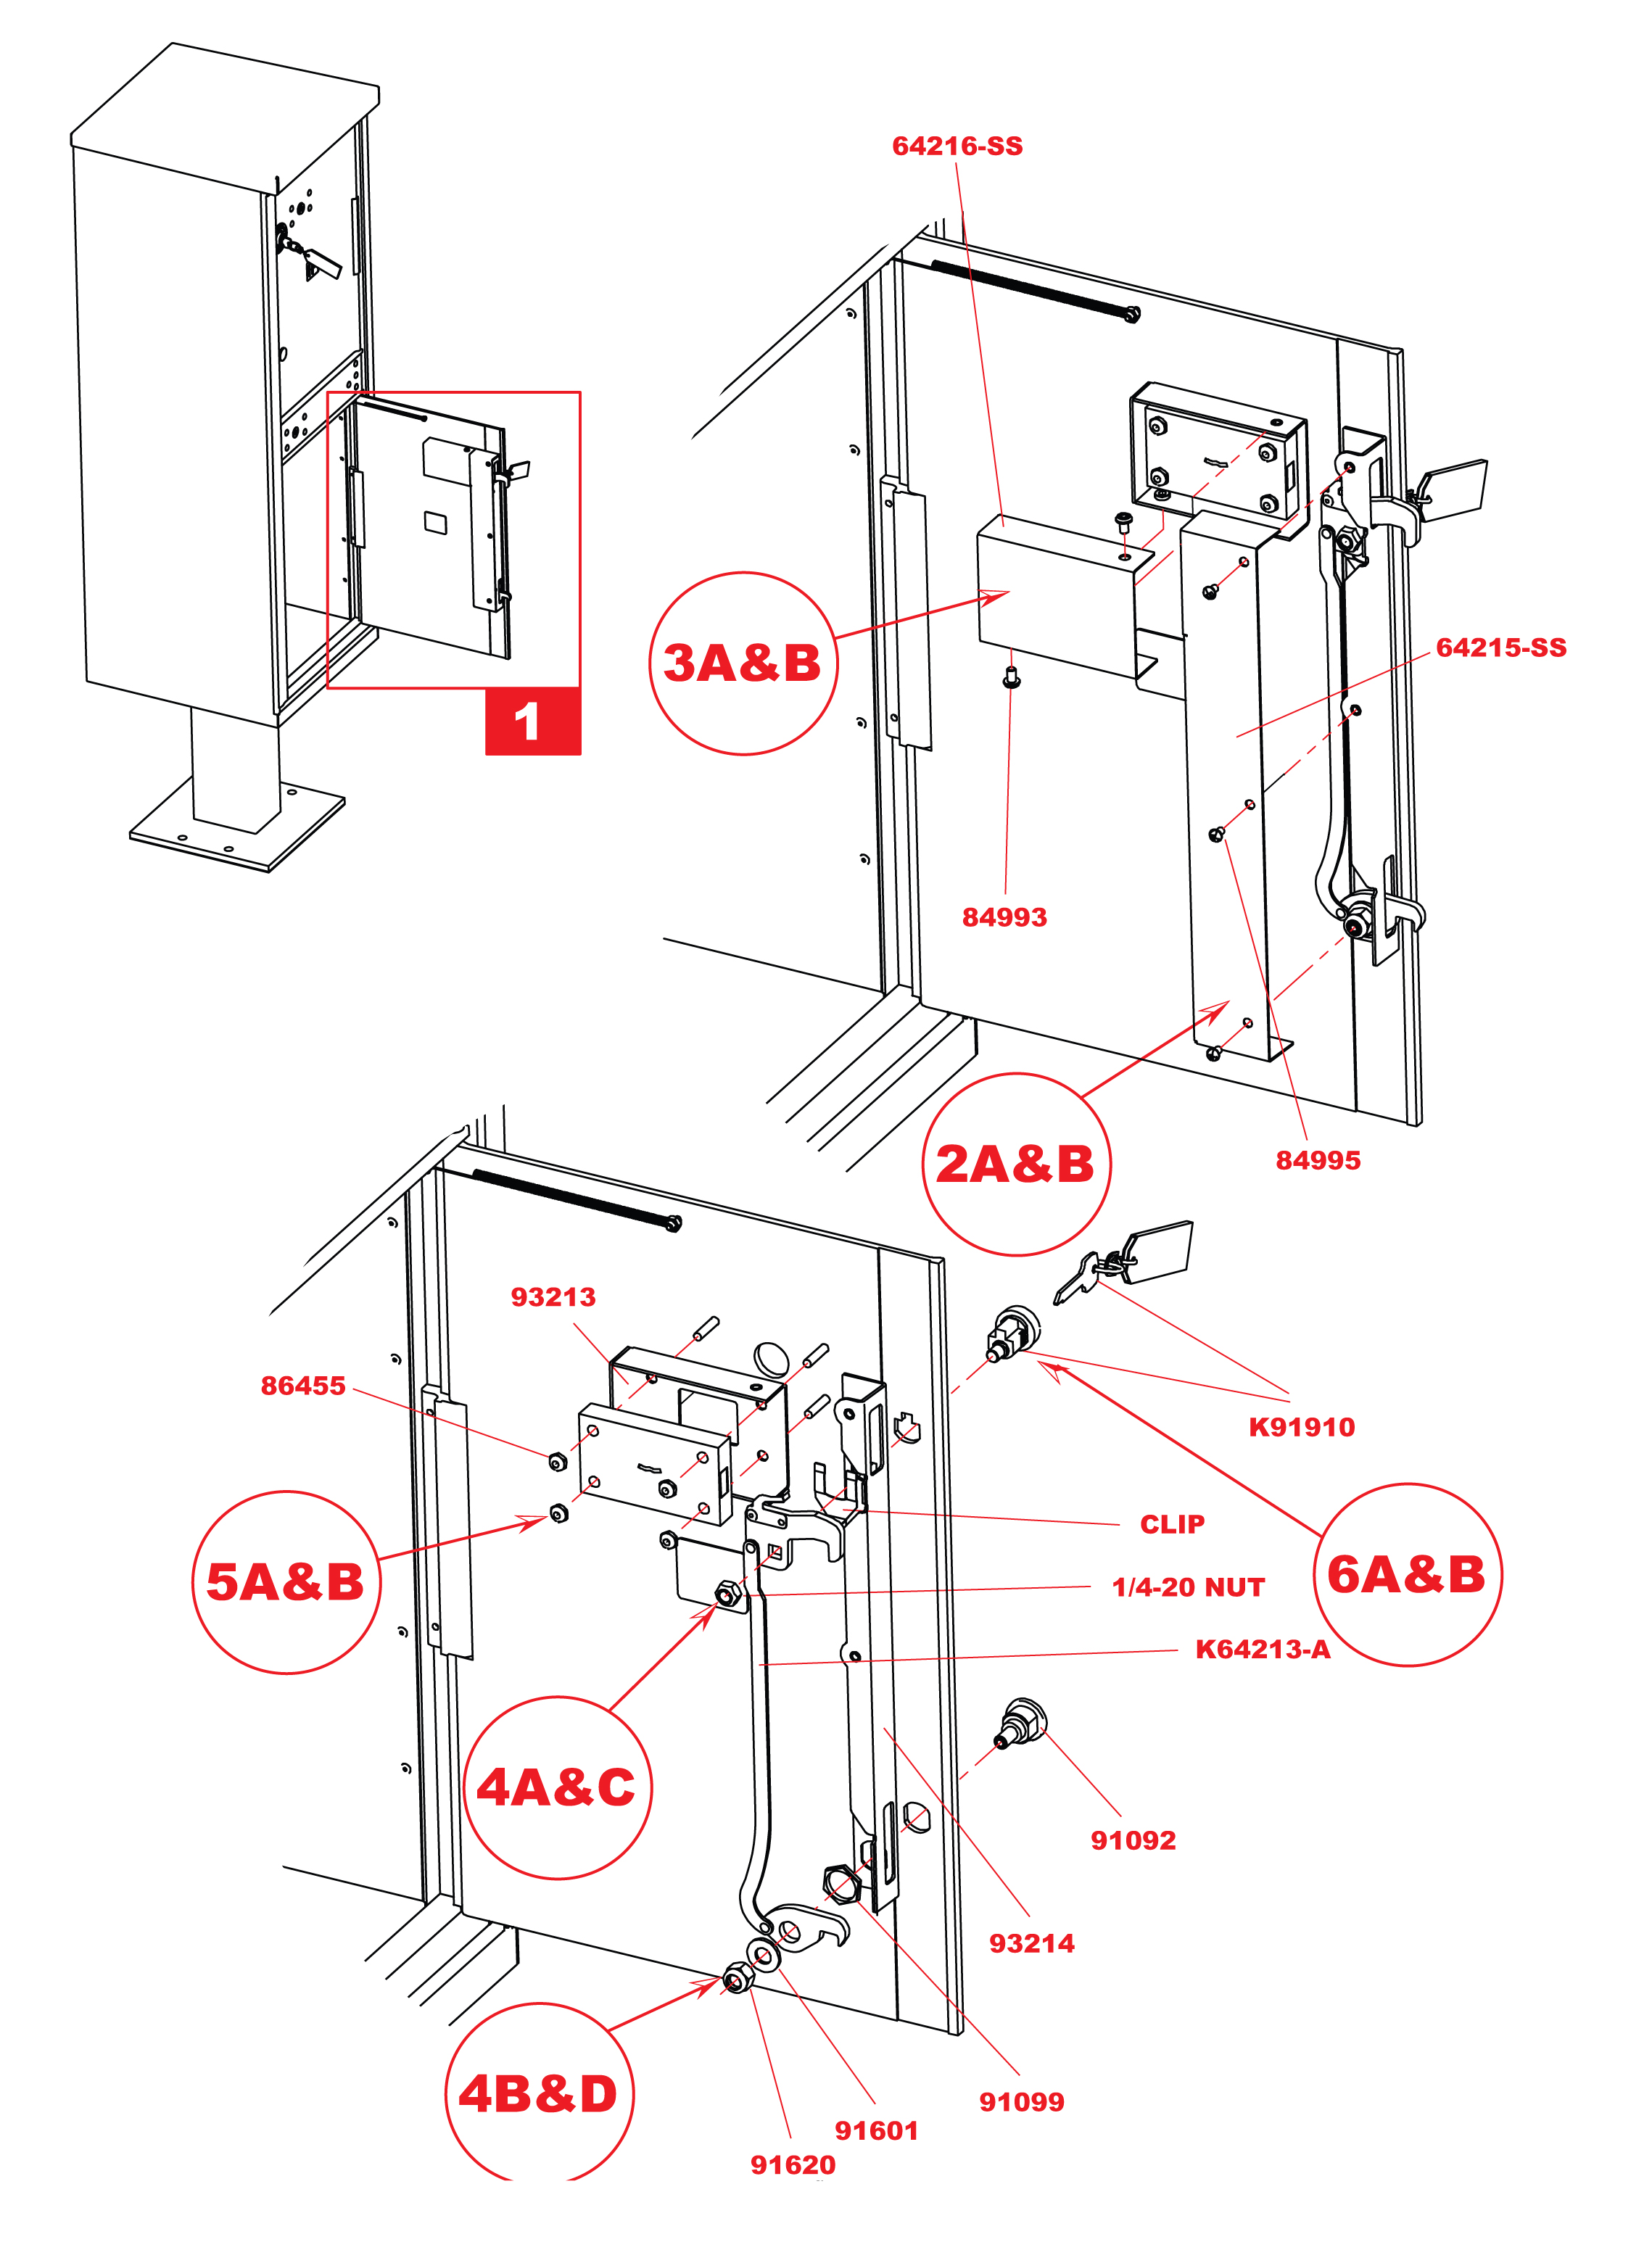
Replacement of Parcel Lock Assembly
Metal OPL Type I
1590 Series
- 1Open parcel door.
- 2To remove/replace latching assembly cover:
- A. Remove or replace 64215-SS latching
assembly cover using three (3) 84995 #10-
32 x .25" tamper proof screws using OneWay
Screw Removal Tool.
- B. Replace 64215-SS latching assembly
cover using three (3) 84995 #10-32 x .25"
tamper proof screws.
- 3To remove/replace Arrow Lock cover:
- A. Remove or replace 64216-SS Arrow Lock
cover using two (2) 84993 #10-32 x .312"
McGard screws using McGard screw driver.
- B. Replace 64216-SS Arrow Lock cover
using two (2) 84993 #10-32 x .312"
McGard screws.
- 4To remove/replace cam assembly:
- A. Remove one (1) 1/4-20 lock nut.
- B. Remove one (1) 91620 3/8-24 hex nut
and one (1) 91601 washer.
- C. Replace one (1) 1/4-20 lock nut
(included in K91910).
- D. Replace one (1) 91620 3/8-24 hex nut
and one (1) 91601 washer.
- 5To remove/replace Arrow Lock:
- A. Remove four (4) 86455 10-32 lock nuts
and remove Arrow Lock.
- B. Replace Arrow Lock securing with four
(4) 86455 10-32 lock nuts.
- 6To remove/replace Customer lock:
- A. Remove one (1) 1/4-20 nut and one (1)
clip (included in K91910), remove lock.
- B. Replace lock - replace one (1) 1/4-20
lock nut and one (1) clip (included in
K91910).
- Note: The parcel door bearing, nut and
Arrow Lock bolts and parcel door bolster
are supplied with the parcel door.
| REQUIRED TOOLS |
| Flat head screwdriver/bit |
| McGard screw driver |
| 3/8" Socket wrench |
| 1/2" Socket wrench |
| 9/16" Socket wrench |
| 7/8" Socket wrench |
| One-Way Screw Removal Tool |
| PART # |
DESCRIPTION |
| 64215-SS |
Latching assembly cover |
| 84995 |
#8-32 X .25" SS tamper proof screw |
| 86455 |
#10-32 Lock nut |
| 1/4-20 nut |
1/4-20 Lock nut (included in K91910) |
| 91620 |
3/8-24 Hex nut |
| 91601 |
Washer |
| K64213-A |
Parcel lock cam kit |
| K91910 |
Customer door lock kit |
| Clip |
Clip (included in K91910) |
| 64216-SS |
Arrow lock cover |
| 84993 |
#10-32 X .312" McGard screw |
| 91092 |
Parcel door bearing |
| 91099 |
Parcel door bearing nut |
| 93214 |
Door bolster |
| 93213 |
Arrow lock stiffener plate |
| K64216-SS |
Parcel lock cover kit with hardware |
| K64213-SS |
Parcel lock kit with lock kit, cam kit
and cover kit |
Replacement of Parcel Lock Assembly
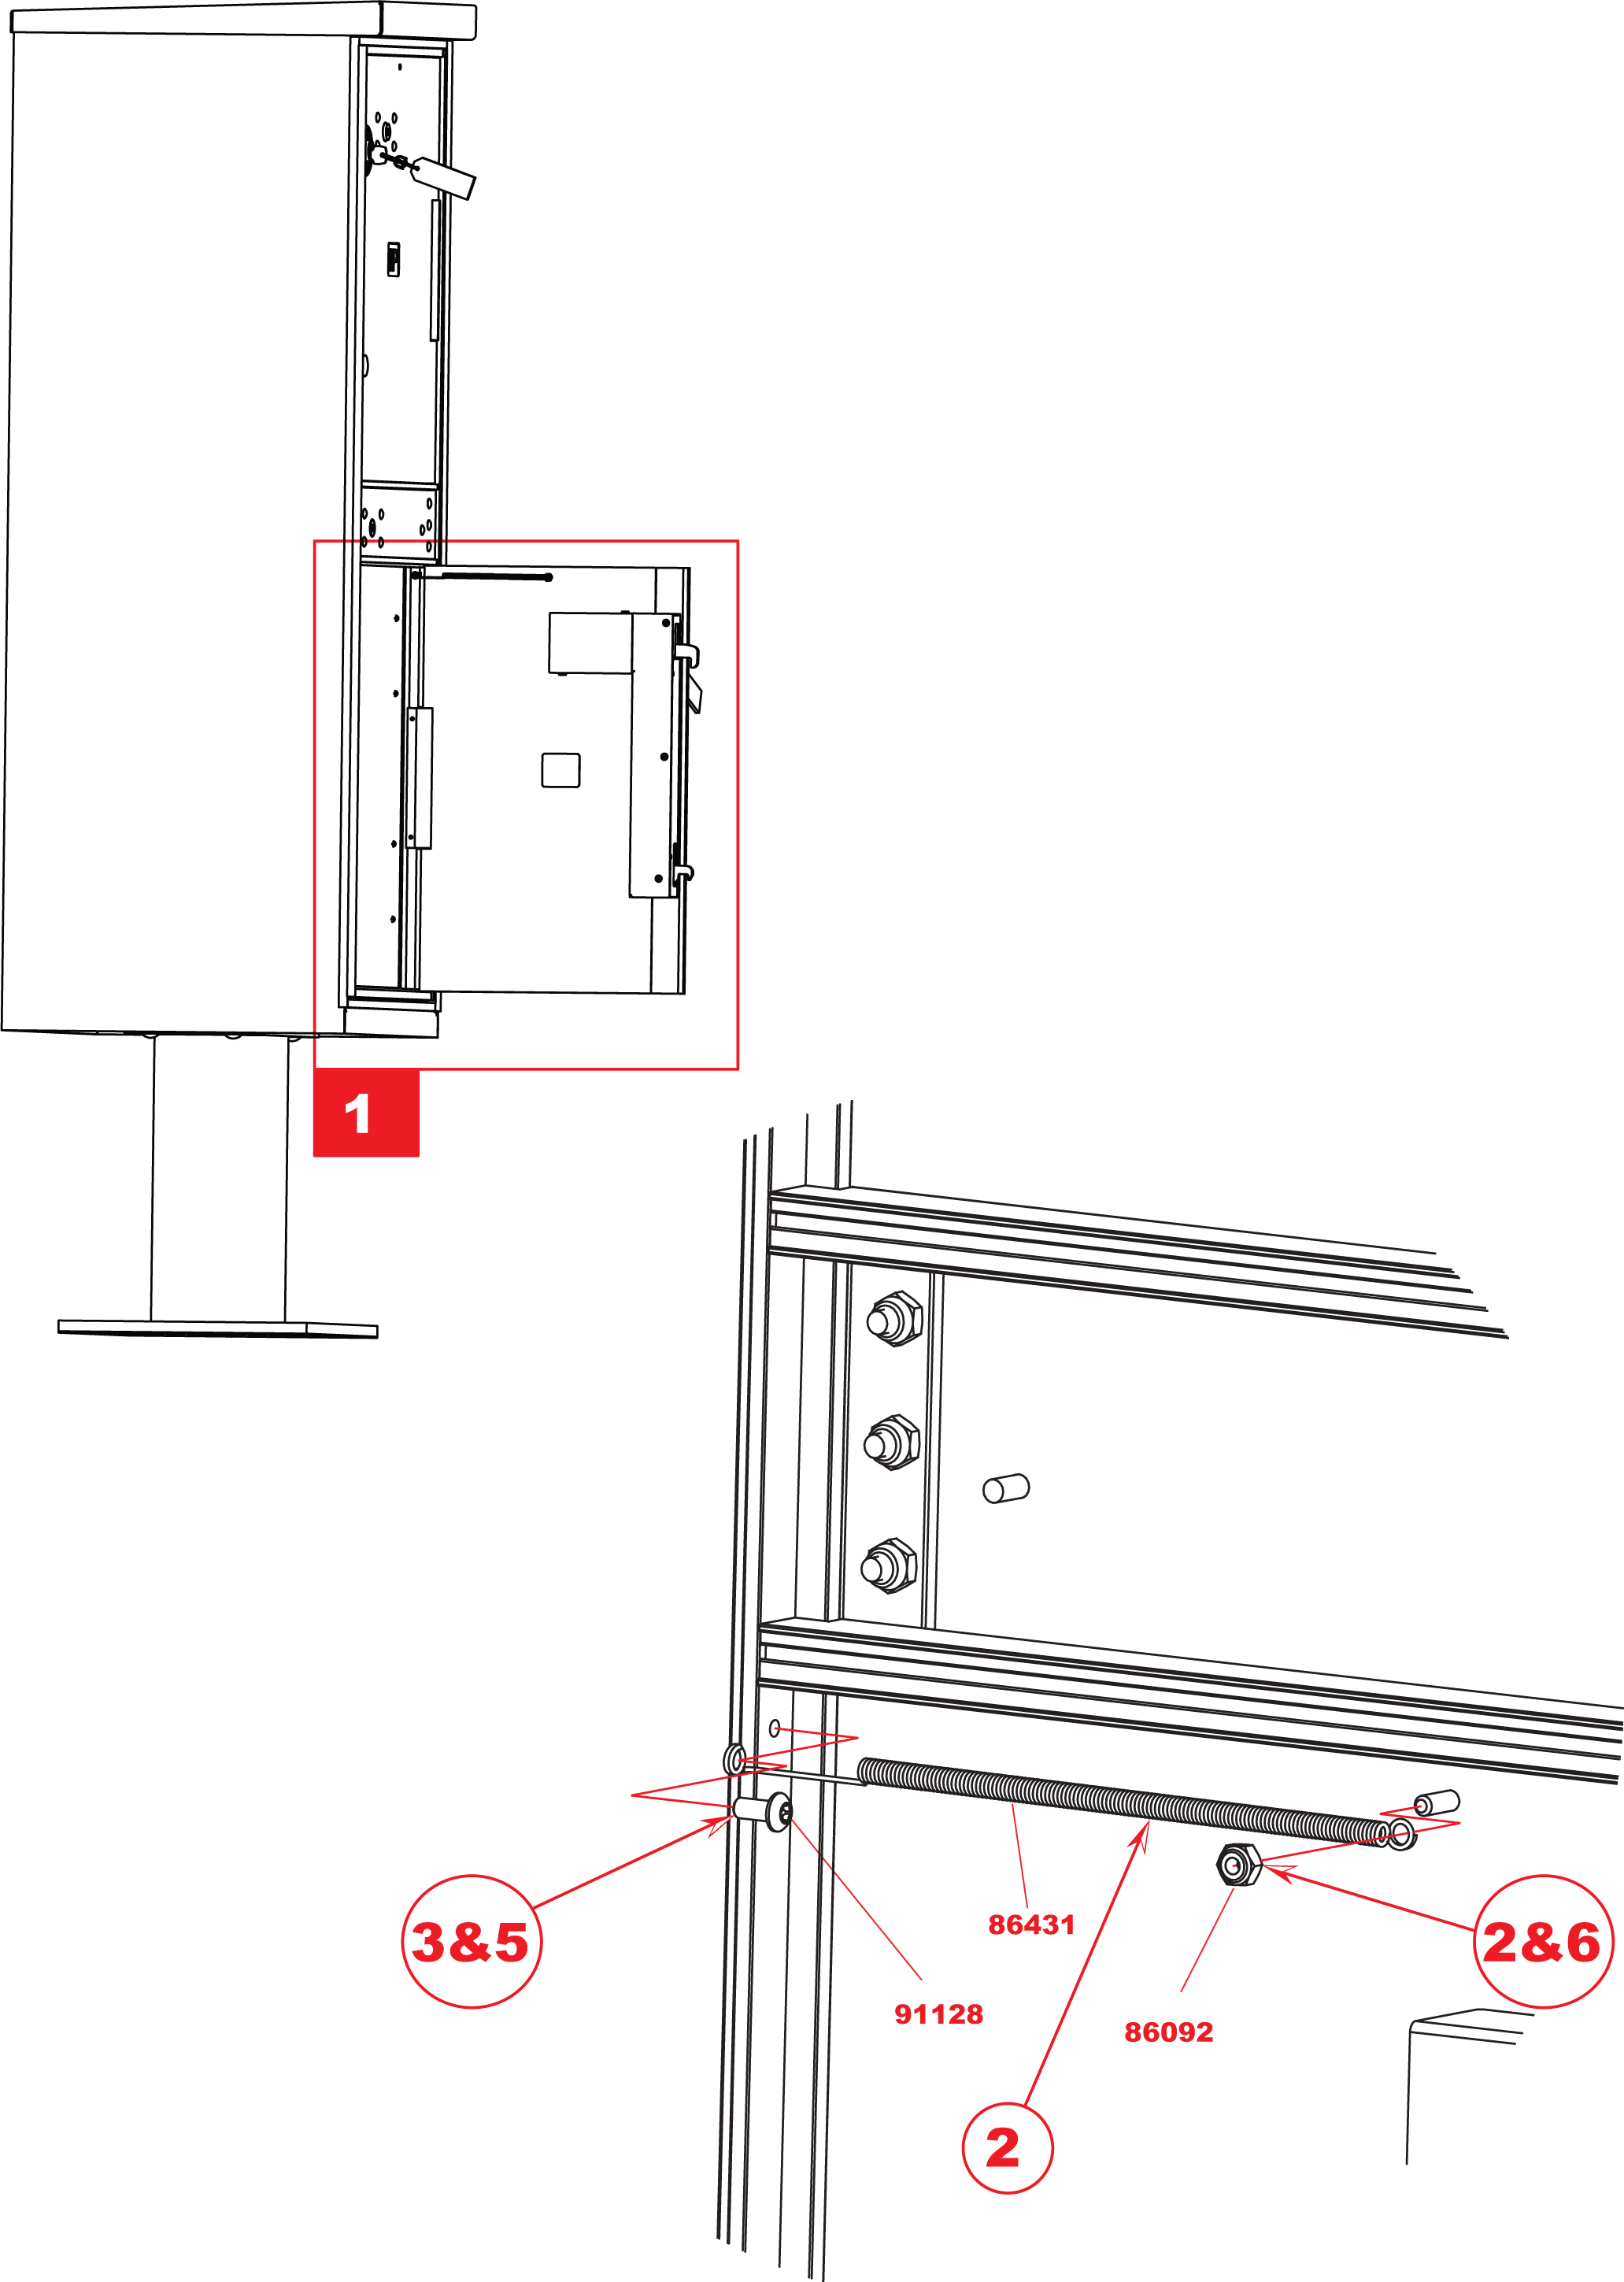
Replacement of Parcel Door Spring
Metal OPL Type I
1590 Series
-
1Open parcel door.
-
2Remove one (1) 86092 #8-32 lock nut from
top back of parcel door.
-
3Remove one (1) 91128 #8-32 x .375" Torx
head screw from vertical frame member and
remove spring.
-
4Replace 86431 parcel door spring with
straight end of spring toward the vertical
frame member.
-
5Place one (1) 91128 #8-32 x .375" Torx
head screw through spring and into the
vertical frame member.
-
6Place spring over stud on top back of parcel
door and fasten down with one (1) 86092
#8-32 lock nut.
| REQUIRED TOOLS |
| Torx+ 15 bit / wrench |
| 3/8" Socket wrench |
| PART # |
DESCRIPTION |
| 86092 |
#8-32 Lock nut |
| 86431 |
Parcel door spring |
| 91128 |
#8-32 X .375" Torx head screw |
Replacement of Parcel Door Spring
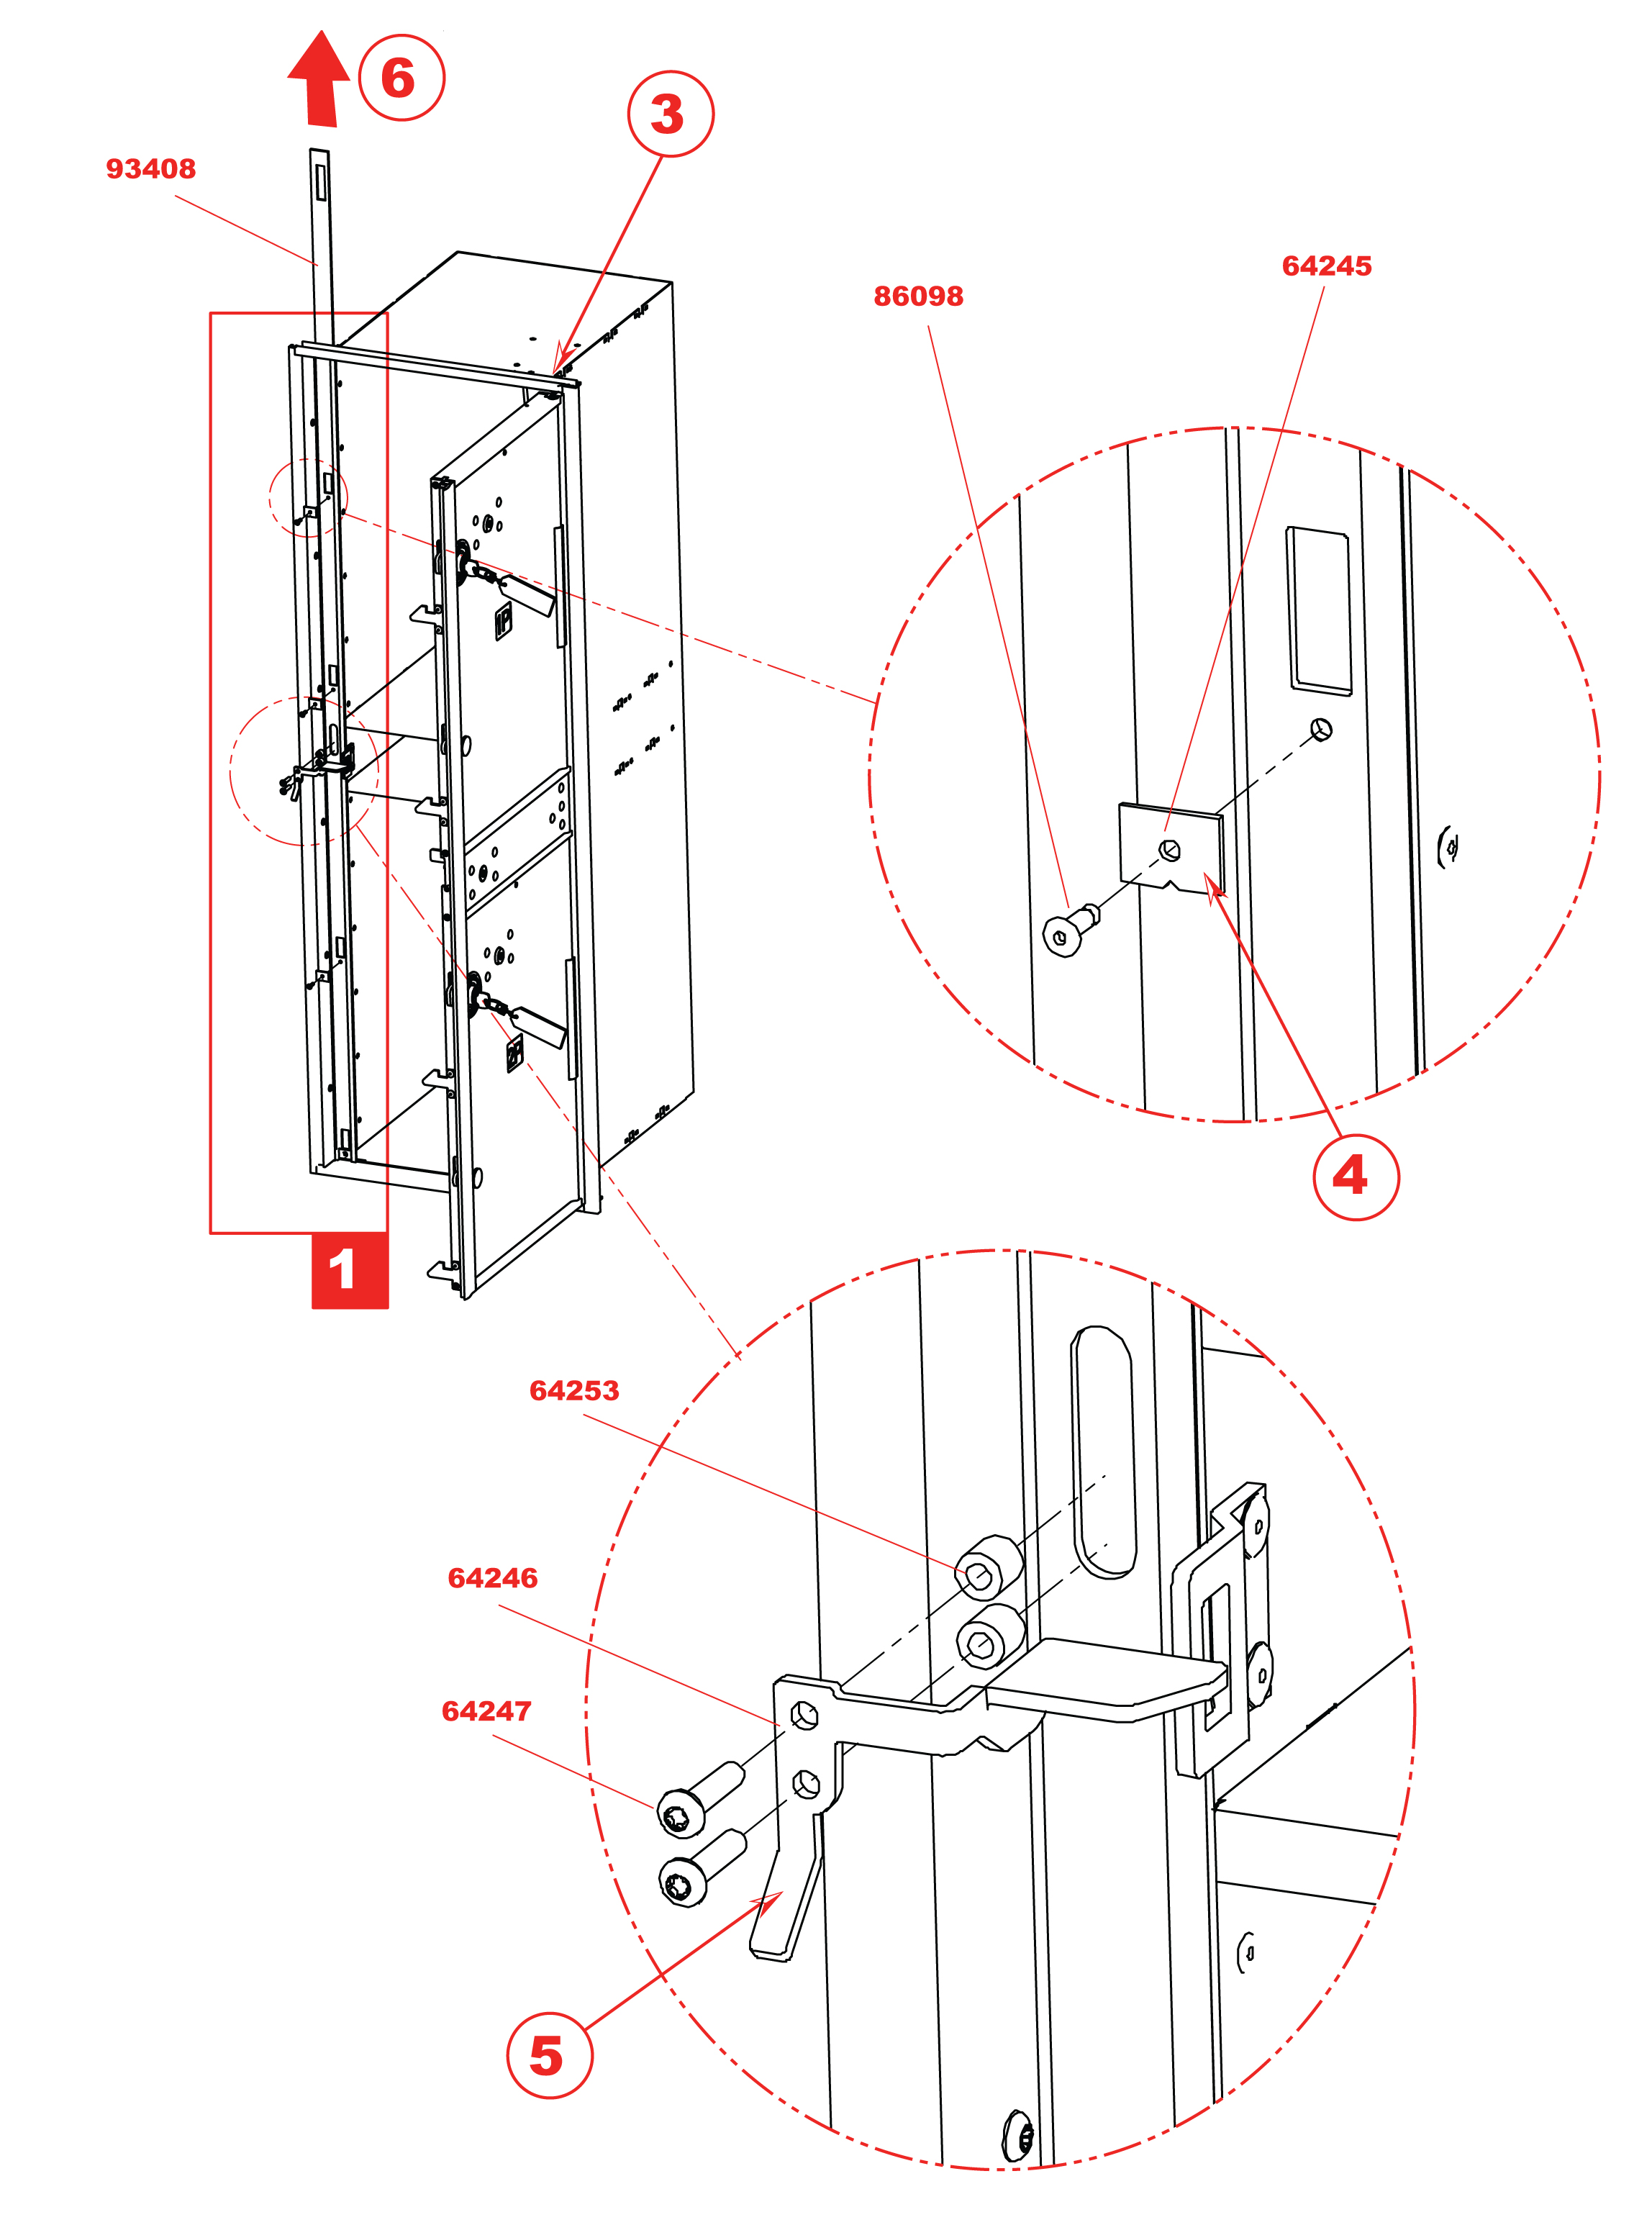
Replacement of Master Loading Door Slide Mechanism
Metal OPL Type I
1590 Series
- Note: This will require opening the master
loading door. The local U.S.P.S. will need
to be contacted to have unit opened.
-
1Open master loading door.
-
2Remove insert from cabinet (see
instructions page 8).
-
3Disengage hold open device from top of
master loading door (see instructions page
6).
-
4Using an 1/8" drill bit, drill out four (4)
86098 1/8" dia x .328" SS pop rivets down
the slide mechanism and remove four (4)
64245 wear plates.
-
5Remove master loading door release
Handle (see instructions page 20).
-
6Removed slide from the top of the insert
assembly.
-
7<Replace slide mechanism and reverse steps
1-6.
| REQUIRED TOOLS |
| Cordless drill |
| Portable pop rivet gun |
| 1/8" Drill bit |
| Torx+ 15 screwdriver / bit |
| PART # |
DESCRIPTION |
| 86098 |
1/8" Dia x .328" SS pop rivet |
| 91037 |
Wear plate |
| 93408 |
Slide mechanism for OPL |
| PH93203 |
Complete slide mechanism with
housing, slide, handle and wear plates |
Replacement of Master Loading Door Slide Mechanism
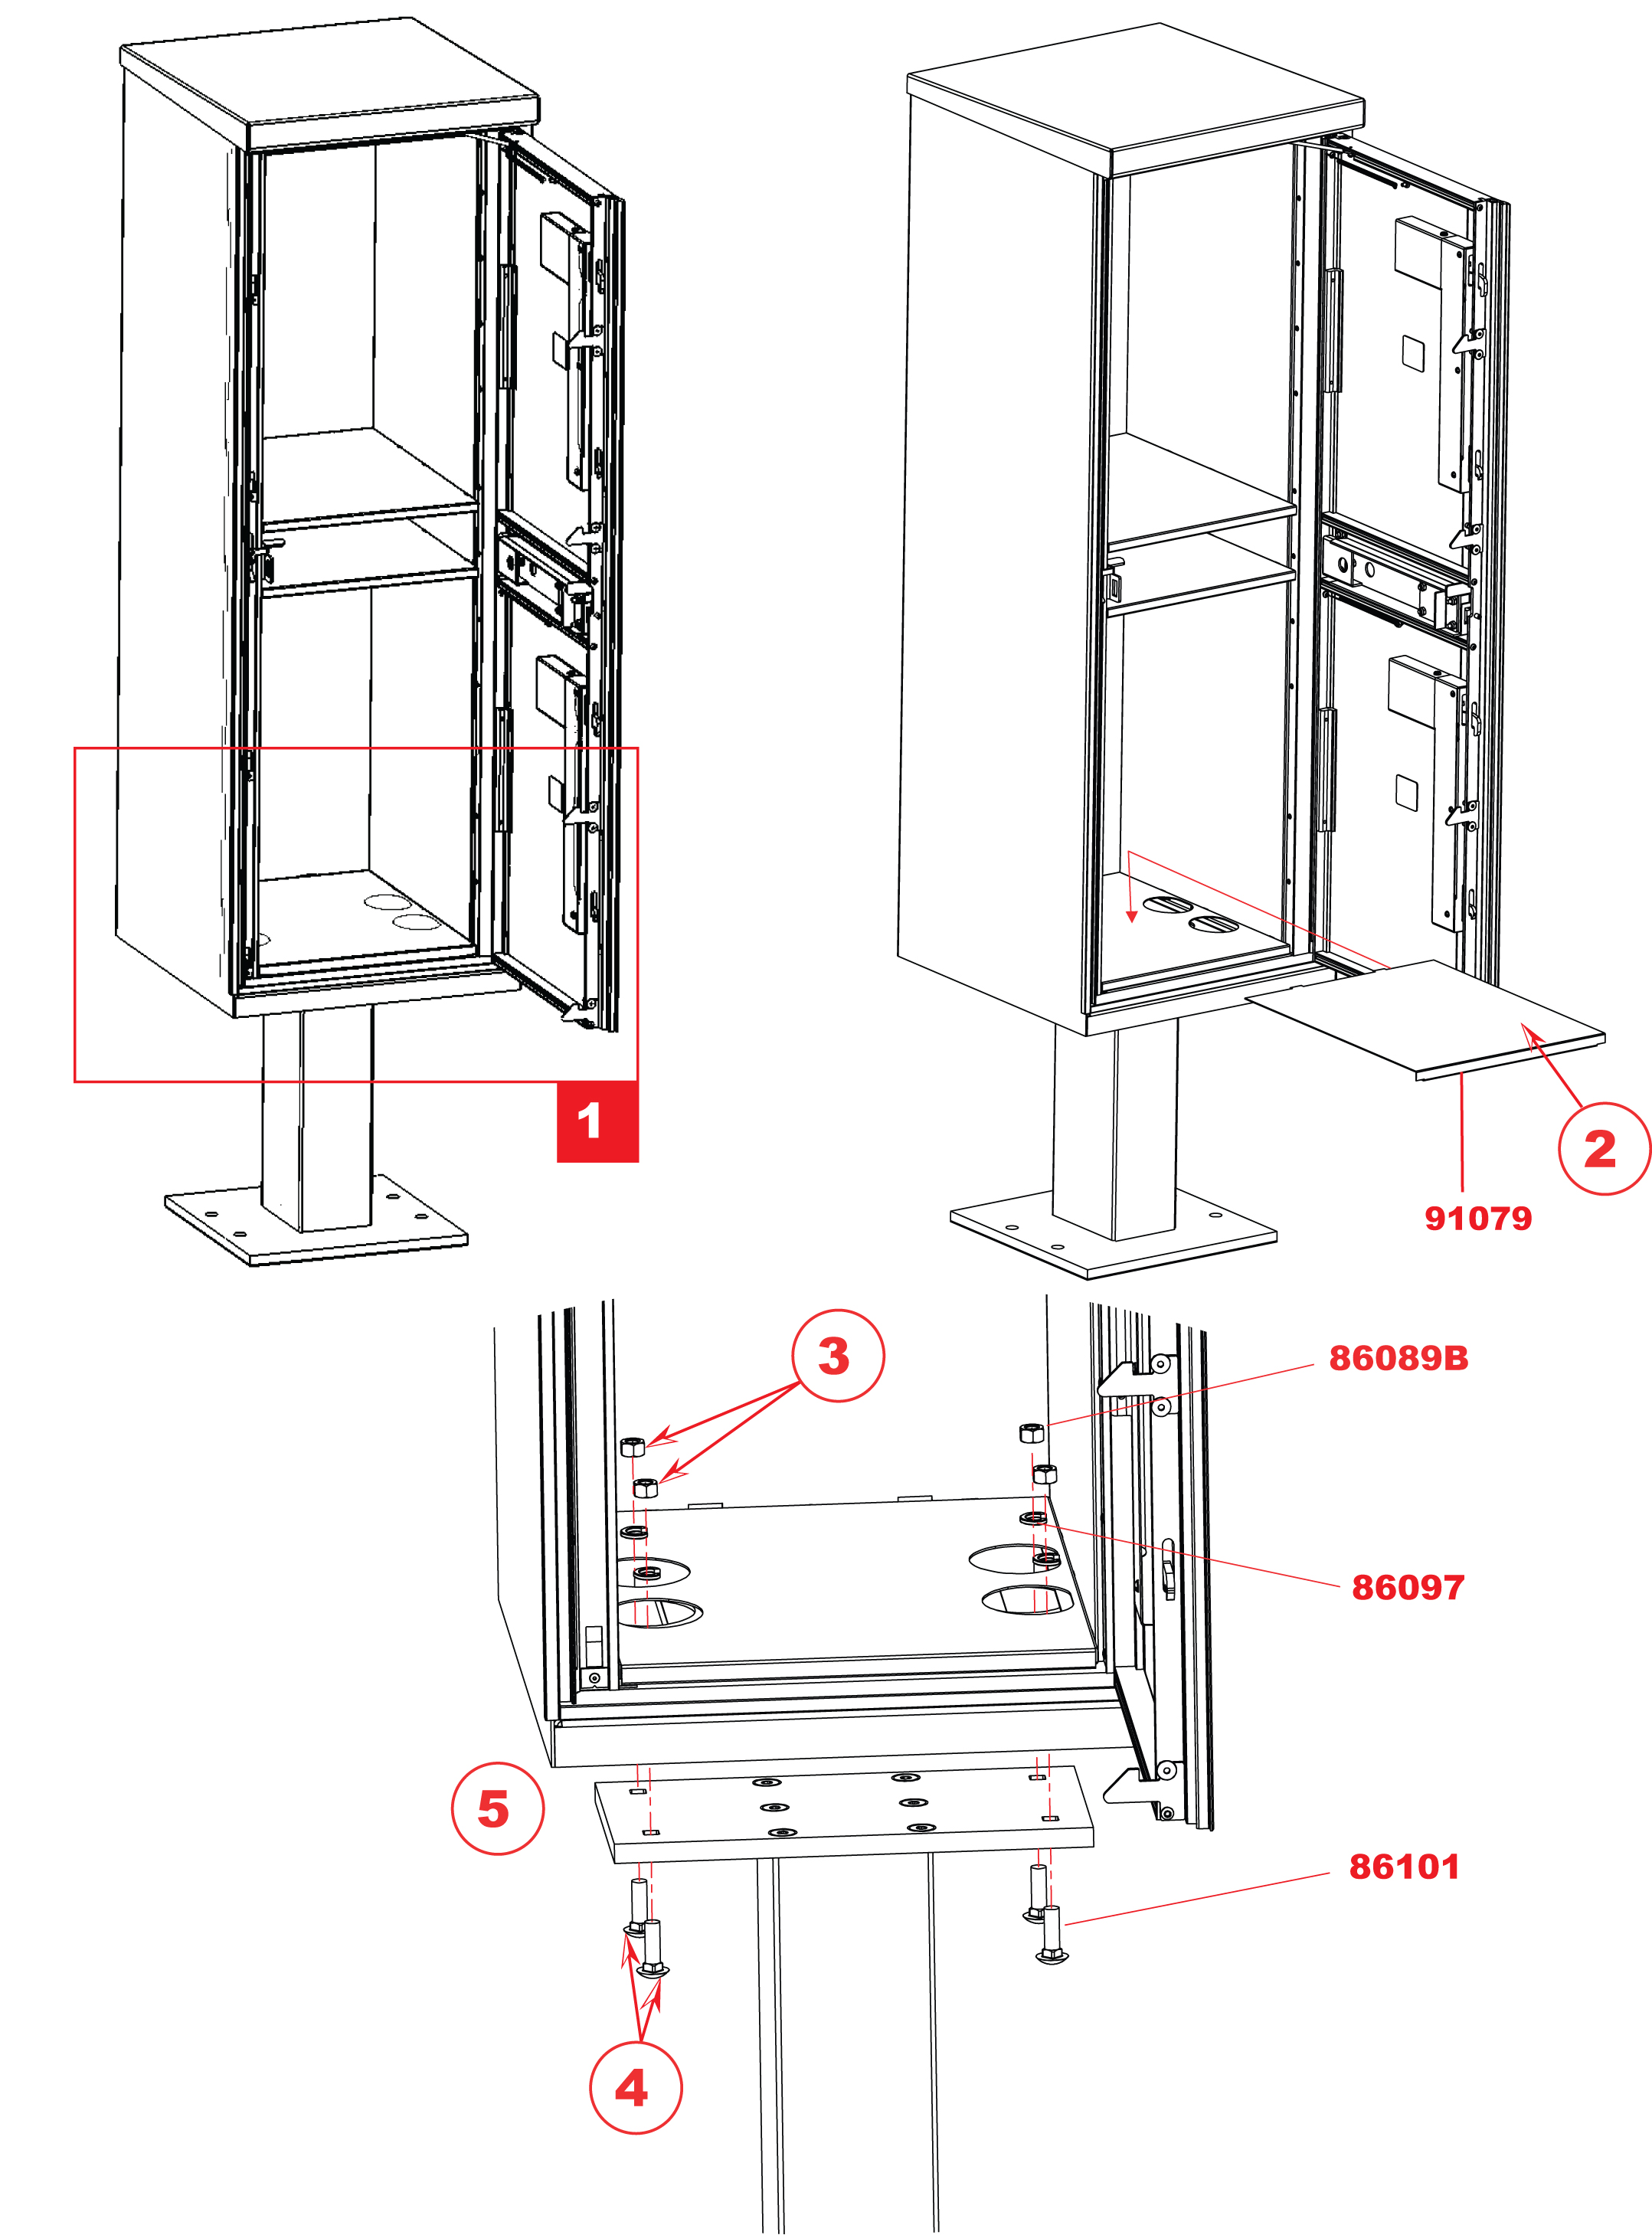
Replacement of the Pedestal
Metal OPL Type I
1590 Series
-
Warning: Unit is top-heavy. Care
should be taken to properly
support unit when removing
mounting nuts and bolts to avoid
possible serious injury.
- Note: This will require opening the master
loading door. The local U.S.P.S. will need to
be contacted to have unit opened.
- 1Open master loading door.
- 2Remove 91079 floating shelf by pulling out
from lip of shelf, exposing mounting holes.
- 3From inside parcel compartments, remove
four (4) 86089B 3/8-16 hex nuts and
remove four (4) 86097 3/8" x .688" OD
lock washer.
- 4From underneath unit, remove four (4)
86101 3/8-16 x 1.25" carriage bolts.
- 5Place OPL on a safe and secure surface and
unbolt pedestal from ground.
- 6To replace OPL assembly, reverse steps 1-5.
Torque pedestal-to-cabinet nuts to 22 FT- LBs
| REQUIRED TOOLS |
| 9/16� Socket wrench |
| PART # |
DESCRIPTION |
| 91079 |
Floating shelf |
| 91121 |
Pedestal |
| 86101 |
3/8-16 X 1.25" Carriage bolt |
| 86097 |
3/8" X .688" OD lock washer |
| 86089B |
3/8-16 Hex nut |
| K86101-F |
Kit hardware pedestal to unit
mounting (includes carriage bolts,
lock washers and hex nuts) |
Replacement of the Pedestal
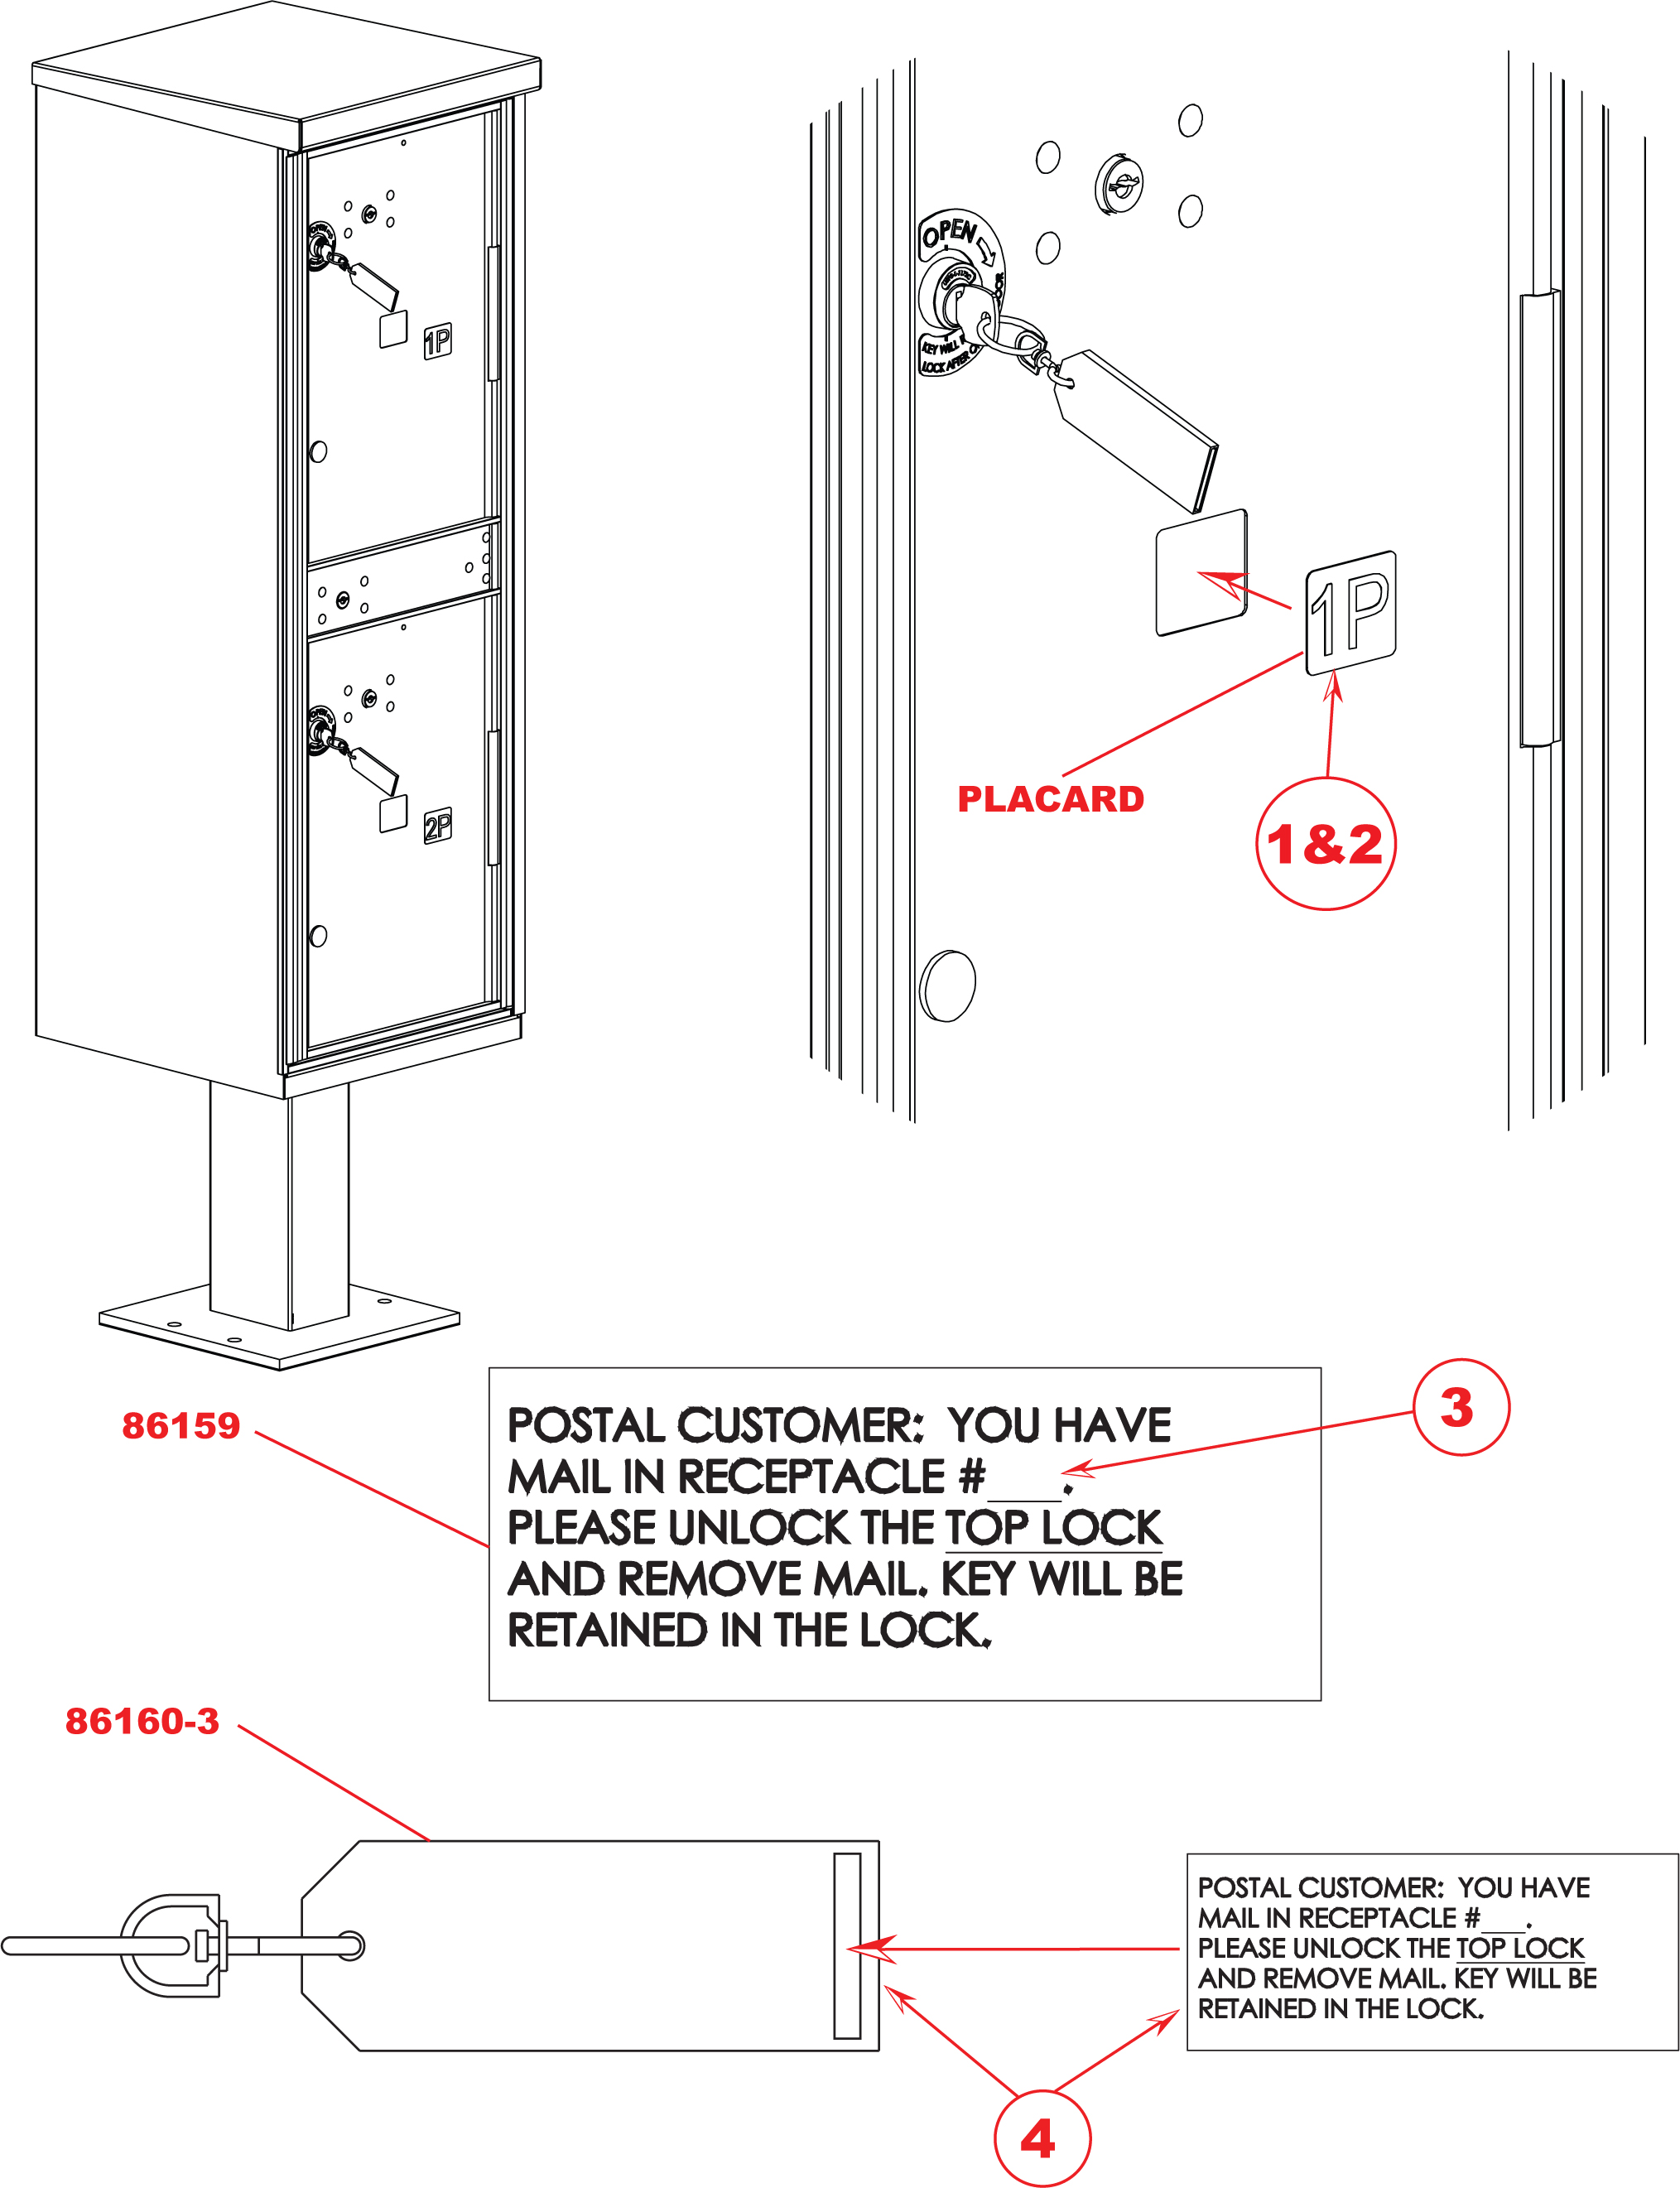
Number Placard Installation
Metal OPL Type I
1590 Series
- Note: If you desire to use placards other
than provided '1P' and / or '2P', you can
order different numbers from your local
authorized Florence Dealer. The options
range from '1P' to '99P'.
-
1Remove existing placard from door and
clean the surface of remaining adhesive.
-
Note: Florence recommends the cleaning of
the parcel door with a soft cloth dampened
with any mild detergent or properly diluted
biodegradable, water-based cleaner, such as
Simple Green.
- The use of petroleum-based solvents,
ammonia, harsh abrasive cleaners, or
scrubbing sponges in NOT recommended,
as this may damage the door surface.
-
2Remove adhesive cover on back of new
placard and place appropriate number
placard in door emboss.
-
Note: to adhere to Postal Regulations, place
the lower number placard on the top parcel
door.
-
3For each of the (3) three 86159 key tags per
door clearly print the door placard number
in space indicated on tag.
-
4Check key operation for door and place
86159 marked key tags in each of the
corresponding 86160-3 plastic key rings as
indicated.
| REQUIRED TOOLS |
| Permanent fine tipped pen |
| PART # |
DESCRIPTION |
| 91511-1P |
Number placard '1p' |
| 91511-2P |
Number placard '2p' |
| 91516 |
Individual number placard '3p'- '99p' |
| 86159 |
1 Key tag |
| 86160-3 |
3 Key ringed tag holders |
| K86160 |
Kit tag holders w/ tags
(Includes three key ringed tag holders
and three key tags) |
Number Placard Installation
 Request Quote